

The main purpose of blowing compressed air through the Rv water pump is to remove standing water from its interior. In addition, the flushing of RV is essential during winter is to prevent the freezing and rupturing of plastic pipes.
Can You Blow Compressed Air Through RV Water Pump? You can blow compressed air through the RV water pump, but first, you have to turn off your heat, gas, and electricity supply for your safety. After this, you should drain water from the freshwater tank, black and grey tank. After this, connect the blow-out plug with the fresh water tank and air compressor. Next, turn on the compressor and pass air shots from them by keeping it at a pressure of 3O PSI.
It will prevent the tanks from bursting because you can’t afford them again; they are costly. Moreover, when moisture gets freezes due to a decrease in temperature. It becomes difficult to supply water throughout RV interior pipes due to blockage, which makes survival difficult.
Steps to blow compressed air through RV water pipes
I have added easy steps to prevent the freezing of water in RV pipes. For this process, you required two main things compressor and blew out the plug.
It is beneficial to do this procedure when the temperature falls from 23 degrees Fahrenheit because you can’t insulate them in a heated environment.
Turn off heat and electricity supply
RV also contains the proper connection of gas, heaters, and electricity supply. For your safety, turn off all the connections before doing any procedure.
You can turn them off before 20 hours or a whole day before blowing air through them. The switch for these heaters is present underneath your vehicle on the backside.
If they are not pre-installed and then you have to add it, the switch is also present in some models. If you still can’t find them, take the owner’s manual guidelines by reading them correctly.
It is necessary to turn off the electric connections because when removing moisture, it may come in contact with electricity and cause a short circuit in RV.
You should also disconnect the heater to cool them because when it is flowing through internal areas with too much heat, it can damage its parts.
It is necessary to turn off the heaters during drainage because when there is no water and it is still on, it will damage the heating element of the heaters.
Turn on your hot side faucets and wait for the water to cool, and then drain them.
Drain water from pipes and tanks
Now you have to drain all the tanks to remove moisture from them. RV consist of three tanks which include
- Freshwater tank
- Greywater tank
- Blackwater tank
First of all, you have to locate them, it is present in the center of your vehicle, and they are also labeled as city water connection.
Screws tighten these; you have to unscrew the valves by using a screwdriver or wrench. When you open the valves, they will drain out from the bottom of the RV through outlets.
You can clear them by parking your vehicle on large grounds. In addition, you can also screw a long duct with an inlet and secure it with nuts.
The large ducted plastic pipes make the clearing easy and readily.
After this, you have to clear the black and grey tanks next to the fresh tank. The black and grey tank is written on their inlets, and their drainage pipes are also present on the bottom side of the trailer.
You should have to screw sewer hose pipes for their clearing while you can clear the freshwater tanks on the grass or ground.
After clearing these three tanks, next, you have to move towards faucets, washrooms, kitchens, and bathrooms taps.
Open up all the tapes and showers so liquid can clear out from them if they remain inside. Now, you have to clear the heater’s associated ducts. The pressure heat valve is located on the upper side of the heaters.
Turn on the heater valves, so the excess moisture runs from it.
On the cold and hot faucets of your kitchen, washroom, and bathroom to clear the holding tanks.
After this, ensure that you have to flow off all the tanks and the associated heaters.
Screw blow-out plug
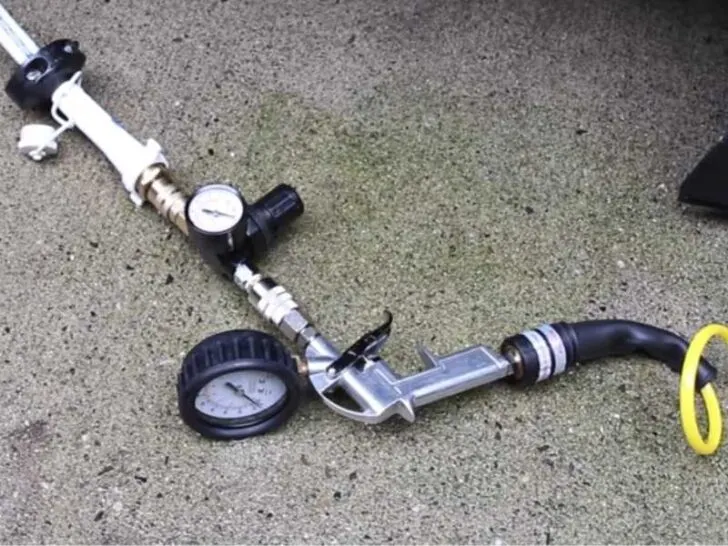
You should connect the blow-out plug with the freshwater tank after disconnecting all of the supply. The blow-out plug will not connect with the outlet directly due to the mismatching of a switch.
Some of these plugs contain plastic material, while others are made of stainless steel, essential to prevent the inlet from rusting.
You will need adapters to attach them, then screw them tightly by using a screw wrench in a clockwise direction.
You are using this plug to connect the pipe of the compressor. After attaching one side with the tank, attach its other side with the air hose of the compressors.
You can attach the air hose with a blow-out plug by taking a flexible duct of air hose towards the plug and then tighten them by moving it in a clockwise direction.
Set your compressor
You should not use oil-based compressors because it can cause the accumulation of debris in ducts.
You have to select the appropriate size of compressors for the blowing procedure. Its size will depend upon the dimensions of the RV.
The smaller ones only contain 3 to 4 gallons which are enough for a small-sized vehicle. For larger RVs, you require large compressors which can accommodate 8 to 12 gallons.
You can also adjust their pressure according to the freezing conditions. When turning them ON, they are filling up, and the reading is shown on the gauge.
You can turn off the valve when you achieve the desired pressure. The standard pressure that is important for safety ranges between 35 to 45 PSI.
You can slightly increase them according to temperature and freezing conditions. However, if you are increasing them more than their standard range, it can cause rupturing of ducts and leakage.
After setting the pressure, gallons and connecting it with a blow-out plug;
Close all the valves, only open one, and turn on your compressors by connecting them with the power supply.
Check that you have removed the water completely and no more is coming from the faucets and showers, then turn off the compressors and unscrew the blow-out plug from them.
Store them in a suitable place by wrapping them in a paper towel because they can be lost easily due to their smaller size.
You should apply 10 to 20 shots of 20 to 30 seconds in one inlet. It is necessary to ensure that all the other faucets of your RV are open for clearing purposes.
You should close the valves after the blowing procedure to prevent the entry of moisture. You can do this procedure on every valve by opening them one by one and applying pressure through the air.
Put antifreeze
It is necessary to flush them with antifreeze to remove accumulated water on the lower side. When you are putting antifreeze solutions in, you should close the hot pipes or bypass their way.
After this, you can drain the pipes by using any detergent to remove the antifreeze solution.
Then flush them with 2 to 3 tanks of water and open all the faucets for cleaning purposes.
Why do you need to blow compressed air through RV Water Pump?
Water is the basic necessity when going anywhere on picnic and planning trips with your family and friends.
You also need them in your RV for drinking, cooking, washing, and bathing purposes. The RV consists of large tanks in which it is present and run into taps through several pipe connections.
When you plan a trip in some hilly and mountainy areas where temperature conditions are too cold, the moisture present in tanks and pipes begins to freeze due to this cold weather.
This freezing cause problem because the moisture will stay in tunnels and expand due to freezing temperature.
This expansion can damage the plastic pipes and cause leakage in RV. Their leakage also occurs, which can damage its metal parts and causes shocks.
You blow air to clean them and remove moisture particles so they can’t freeze in a cold environment. This freezing problem also occurs in the winter season due to a regular decrease in temperature than normal.
If you don’t remove the standing moisture from its internal side, the expansion of ice also causes rupturing of tanks.
What is compressed air and its purpose?
It is a mixture of 4 major components: nitrogen, oxygen, other gases, and water vapors. It is almost the same as the air you are breathing and atmospheric on the present in your surroundings.
When the pressure is created in them, which is greater than the atmospheric pressure, it is called a compressed one.
It generates slight heat energy when you connect them with the compressor. The primary purpose of using this is that it will move the small particles.
Due to the pressure, the moisture molecules move faster from their place. Therefore, its temperature depends upon the energy of molecules.
If molecules move with greater speed, the kinetic energy will increase, which ultimately raises the temperature of that gas.
Why is compressed air better than antifreeze?
The blowing of compressed air is a more beneficial process than antifreeze because it is easy, and you can do it in less time.
The cost for this method is also less than antifreeze. You don’t need to flush off the lines after blowing, while when you are using these solutions, you have to rinse the lines with extra tanks of water.
Compressed air is better because when you mistakenly can’t rinse them properly, its small amount is toxic for body parts.
Moreover, this is a safe process and takes less energy and time. This process is also beneficial because it takes less electricity cost and power supply.
This process is also cost-effective because air is free; you don’t need to purchase gallons of solution for this whole procedure.
How often do you need to blow compressed air through RV water pipes?
It depends on the weather condition where you are living or traveling. If the weather is cold, you can do this process twice or thrice a month to prevent the ducts of the RV.
It is necessary to maintain them properly because the expansion of ice can cause wear and tear in the inlet pipes, increasing the humidity of the internal environment.
If the environmental conditions you live in are not too cold, you can do this once a month.
During snow falling, you can do this procedure once a week to solve this issue.
Time required and cost
The time depends on the handling skills of the person who is doing this task. If you hire experienced professionals with you for this process, it will take a maximum of 2 to 3 hours.
Its cost will depend on the length and dimensions of your RV. If it is small, you need a compressor with 2 to 3 gallons, which will also take less time.
When the compressor is connected with the electrical supply for less time in this situation, it will also save your cost for this procedure.
Related Articles:
Why you should never dump the RV antifreeze on the ground?
Why would you use the RV Macerator pump 120 volts?
What’s the price of the most expensive lance travel trailer?