

Many people like composting toilets in the RV due it their benefits. Also, they have a built-in exhaust fan, vents, and other connections that facilitate the removal of unpleasant odors.
How to Install a Composting Toilet in an RV? You can install a composting toilet in an RV by selecting an appropriate size, adding a gripper plug on the bottom side, and installing a platform base. Next, adjust the compost toilet seat, put the mounting brackets, add nuts and tighten them. Furthermore, add a vent fan, make a link between hose and compost toil, and fix everything.
In addition, these user-friendly systems are economical, and installation costs you around $170 to $200. Also, it is long-lasting equipment, works perfectly for 6 to 7 years, and requires emptying after 4 to 4.5 weeks.
Furthermore, these efficient toilets may cost you around $1500 to $3000, and the prices increase with different facilities.
Typically, it is an appealing addition for camping people because the system can withhold the waste for more than 20 days without generating any smell.
Also, it saves electrical charges and prevents connection problems because it is self-contained equipment and does not require any sewerage facilities.
What is a composting toilet in an RV?
Typically, a compost toilet collects human waste without plumbing and transfers it to the container. Also, it helps in the organic disposal and movement of waste material. In addition, it produces fertilizer or compost.
As a result, the overall system provides hygienic conditions inside an RV and keeps the environment healthy for all travelers.
However, it is an excellent alternative and supports the RV waste system. Also, it is known as a dry toilet that comprises a treatment system that decomposes human waste material and changes it into nitrogen-rich material.
In addition, it is a next-level addition in any RV because it facilitates several benefits of comfort and controls the freshwater tank levels.
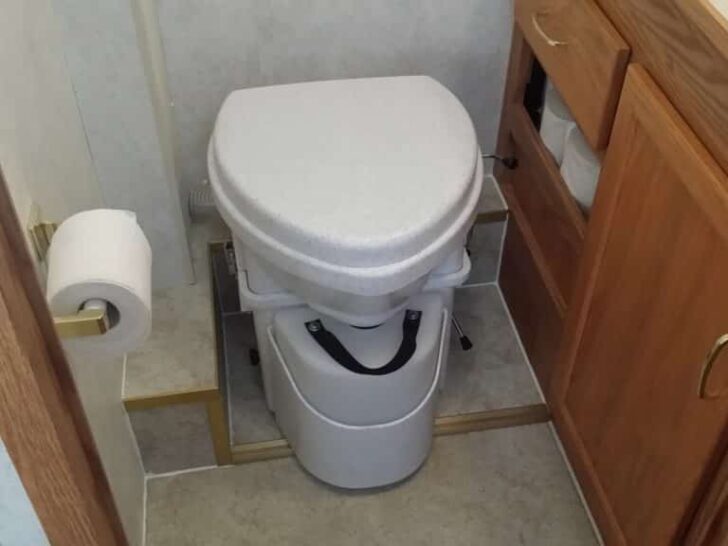
Also, it has a similar lid to standard toilets with an identical design. The pipelines and other components vary due to their versatility.
What is the method to install a composting toilet in an RV?
Follow the below guidelines for appropriate adjustment of this toilet seat in your vehicle with all relevant connections.
Also, the guide helps with the appropriate accommodation with controlled techniques for standard performance.
Select appropriate size and color
In the beginning, check the RV bathroom area’s space, size, and stability. Also, take dimensions of that particular spot to accommodate a toilet seat better. In addition, select them according to their automatic and semi-automatic performances.
Furthermore, their colors depend on the user’s choice and select them according to the walls and interior of the RV bathroom.
A few are entirely electric, and others have a few modifications. Select them according to your design and quality preferences.
Detach old water pipeline
Numerous RVs with bathrooms and toilets have built-in pipelines that do not cooperate with the composting systems.
For these setups, remove the water pipelines that already exist with the other water mechanisms of any RV.
Then, check the water pump and turn it off. As a result, it prevents water loss and does not spray it all over. Next, hold the pipeline end and disconnect it from the built-in toilet seat.
Then, remove the seat and keep it aside for future installation. Avoid the application of excessive strength, and keep its parts intact. Then, put the cap of the pipeline back edge and proceed to the next step.
Add gripper plug
The underside of the toilet comprises a hole in the bottom section. Also, it requires a gripper plug for appropriate adjustment.
Insert it inside the hole and fix it at one point. Then, hold the plug and tighten it firmly. Next, add a nut on the top side and seal the hole.
Add a platform
Use plywood to make a stable platform for your toilet inside the RV. Next, use a sheet of plywood and stabilize it over the toilet seat. Then, increase its height from the sides and keep the eight around 2 to 3 inches.
As a result, the base becomes stable, and it does not move while the RV moves on roads. Also, keep the sewer hole separate from the other setting and never block the passage with support.
Then, add studs to the base and attach them to the floor or walls.
Adjust the toilet seat
In this step, hold the toilet seat with the help of your friend. Then, add it to the stable base and adjust it on the desired spot. Also, check its mounting brackets and fix them on the seat base.
Add screws and combine them. Then tighten them one by one and check stability. The composting system has a separate mounting bracket with built-in factory screws for each flushing tank.
Add the screws inside the mounting brackets, tighten the nuts and fold the attachment parts inwards. This RV toilet can support heavy persons.
Connect the exhaust system
The ventilation and exhaustion of odors are essential with these compact toilet designs. Install a vent fan, and select an appropriate spot on the wall or floor. Also, you can add it outside the toilet compartment while judging the efficient electric passage.
Now, make a 2 to 3 inches hole with a drill machine, add the fan and vent on the wall. Then, adjust an external cover and prevent bug penetration.
Next, connect the vent fan electric wire directly to the RV battery or use a switch. Both ways help you to control the ventilation.
With a battery connection, the smell exhausts outsides all the time. The system keeps working during such conditions thoroughly, but with an electric switch, the control is convenient.
In addition, it is advisable to wire the switch with the vent fan in a parallel manner by many experts.
Select such methods for controllable electric power use. In this way, you can run the ventilating equipment with minimum effort.
Now, establish a connection between the toilet seat and the vent hose. Then, split the hose into equal halves, and install the connectors.
Also, consider the connections develop with glue and remains firm in their original spots. Use a high-quality sealing material in such situations.
Adjust all parts
In the end, adjust all the parts in their confirmed spots. Then, settle the liquid and solid flush tanks appropriately. Now, install the wing nuts on both sides and tighten them.
Furthermore, attach the top side of the compost toilet to the solid waste container. Then, connect the hose and the ventilation fan through a defined route.
Check the connections, and fix everything according to manual instructions. Then, use it according to the limits and also control the levels of solid and liquid waste tanks. It is better not to use RV toilet while driving.
Why would you add a composting toilet in an RV?
Generally, the composting toilets in an RV are better than a standard flushing system because they utilize a minute amount of water.
Also, they are a productive system, facilitate eco-friendly waste disposal, and use advanced electric mechanisms.
Odorless waste discard
The prime advantage is that the compost toilet removes the undesirable odors with vents, exhaust fans, and ventilation passages. Also, the anaerobic processing mechanism contributes to instant odor removal.
As a result, the internal environment rains friendly for all travelers. In addition, as a mixture of human wastes with other materials, the odor reduces.
In addition, the system can flush waste instantly with a small amount of water without harming the tank condition. However, it can save 20 to 30 gallons of water and promotes RV living.
Appropriate waste handling
They can handle human waste appropriately by biological processing and composting techniques. Also, in these procedures, the decomposition of organic material happens, and the material turns into a high-quality material.
Collect the waste matter in massive polythene or plastic bags, take it to a campground, dump the compost toilet waste on these holes and leave for decomposition.
Eco-friendly waste disposal
It is eco-friendly, with convenient maintenance and a longer lifespan. Also, it can remove waste material without plumbing a sewer connection. In addition, such a flushing mechanism contributes to green lifestyles.
As a result, they promote and facilitate fresh air inside the RV, keep the living conditions hygienic, and prevent waste accumulation.
Also, the recycling procedure helps produce environmentally friendly materials and supports the fertilizer industry.
Appealing addition
The branded and well-known products are attractive, add versatility to the RV toilet section and make it appealing for travelers.
Also, they are comfortable using different conditions with automatic control mechanisms. In addition, these are cost-effective items with diverse versatility with different colors.
Related Articles: