

Starter relays are electronic devices with a remote control switch. They are moderators of the electric current in the system.
How Do You Test a Starter Relay on a Ford F150? In general, you can test a starter relay on a Ford F150 by inspecting the batteries and their connecting points. Next, test the electric wires and the passage of electricity in the starter relay. Then, finally, inspect the whole device with the relevant connections.
A system that lacks the starter relays can lead to various damages. The presence of a high circuit current can cause a sudden breakdown of electric appliances.
How Do You Test a Starter Relay on a Ford F150?
Here are 5 easy steps to test a starter relay on your Ford F150. First, identify the tool with the pictures and documented information.
The approach also allows you to test the surrounding components that can affect the starter relay.
Finally, removing all errors makes the device sufficient to perform in the high current circuit conditions.
A professional person can also help you to find such devices in your truck. You can take expert help to reduce the chances of all errors.
The testing process becomes error-free due to instructions and the involvement of professional techniques.
Check the overall battery
The problems of the starter relay depend on the condition of the battery and other relevant connections. So, first, access the battery and then inspect the structure thoroughly.
Fix this problem by removing the terminals of the battery. Detach them and make sure no electric connection is there.
The accidental striking of the electric wires with the connecting points can lead to various problems. First, take cleaners and fiber-free cloth to clean the battery surface.
Use wire brushes to remove the corrosive layers from the battery surface.
Clean its terminals with the same techniques. You can leave the electric wires without connection. It resolves the problem of electric short circuits.
Check and observe the electric wires
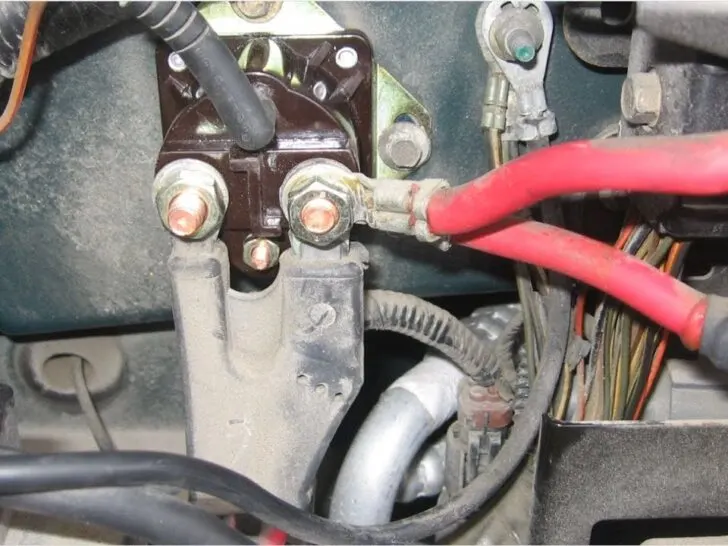
The test of the electric wires and electric terminals on the starter relay is essential. First, check the passage of electricity from the solenoid to the starter relay.
It provides a clear picture of the excellent performance of this device.
It is made of 3 to 4 terminals. Check that the system includes all-sufficient terminals on it for the activity.
Observe the electric wires and their connection to this device. The switch of the circuit allows the movement of two electric wires.
Test these passages and make sure they are joining the right way. The electric wires get electricity from the battery. In case of any error, remove the wires and mark them with a non-permanent marker.
Connect them on their joining points and secure the system. You can use one thick electric wire to connect the system.
Start from one end of the battery and move it to the starter relay. You can also join the ends to the ground connections.
Check the electric passage
First, access the battery’s positive terminal and select a connecting point and add the electric wire to it. Finally, you have to attach the thick electric wire to this connecting joint.
You can leave the thick wire with the battery when the system is not providing electricity to the device. Leave the system in this way for at least 15 minutes.
You can check the resistance and tension of the electric terminals. There are specific devices that provide data about such things.
Use a voltmeter to find the resistance between the battery terminals.
Always consider the digital devices for accuracy and removal of errors.
You can identify the pattern of resistance between the ground connection and terminal 87.
The standard parameters of the electric resistance are less than 1 to 2 ohms. Therefore, it cannot exceed this limit, and there are chances of high current circuits.
The presence of higher resistance from the actual values shows that the device is not working precisely. Therefore, you have to replace such devices in case of high resistance situations.
Connect the starter relay with the ignition switch
In this step, you have to connect it with the ignition switches. The connection is necessary to find out the actual performance of this device.
Access the battery and reconnect the electric connections. Adjust the positive terminals on the battery of a Ford F150.
Join the connections, and electric energy flows through these devices.
Test the switches of the Key section and then proceed for further connections.
Make sure you do not connect the negative terminal of the battery for a firm connection.
Attach the negative electric wire with the terminal. Build a stable connection and then test the performance of the device.
The verification of the performance is through the control of high current. Thus, there is no danger to the appliances when the starter relay joins with the battery effectively.
Connect the battery and observe
Connect the battery with the starter relay and turn on the current appliances. Observe the electric devices and their standard performance after such testing conditions.
In addition, you can handle the electric tool with the remote control device.
Turn on the truck and leave it on ignition for at least 10 to 15 minutes.
Observe the battery and the connecting terminals with a link to this electronic tool.
Assess the problems and remove them from the precise location.
Maintenance keeps the Ford F150 safe from sudden short circuits and appliance damages. The testing process takes around 20 to 25 minutes.
Related Articles:
How do you replace a U Joint on your Ford F150?
How to reset the fuel gauge on a Ford F150?
Which side is Bank 1 on a Ford F150?
How do you reset the airbag light on Ford F150?