
A brake controller is an electric tool, efficiently uses electricity and transfers signals to the RV brakes. For towing conditions, the electric brakes are useless without these controllers.
How to Install Brake Controller in RV? You can install a brake controller in RV for electric brakes by selecting a dashboard spot, prepare it, and drill holes with no dashes. Next, adjust the mounting bracket, tighten the screws, and fasten the brake controller. Connect the plugs, joint the 20 and 40 amp breakers with the battery and stabilize electric wires. For a wireless brake controller, use a Bluetooth connection, and maintain high voltage.
Topically, they increase the RV service life, utilize the electric voltages, and supply maximum braking power. Also, several states have a law that prevents high speeds while weighing 4800 pounds to 5000 pounds, but they are efficient with those trailers.
Also, insulate the electric wires but never fade their colors, mark them with a non-permanent marker, and develop connections in the absence of electricity.
For a secure system, maintain the battery, upgrade brakes and handle the complexity with patience.
Method to install wired brake controller in an RV
To install wired or electronic brake control, a person requires mechanic expertise, sufficient tools, and procedure details.
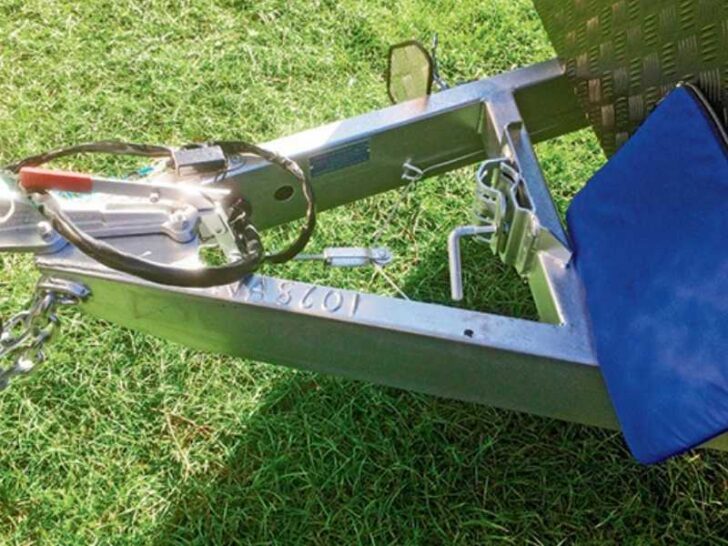
Prepare the surface to adjust the brake controller
Anytime you deal with RV electricity, the best idea is to turn off the battery. Also, leave the system for few minutes, and from the electric source, disconnect everything in the vehicle.
Prepare the spot, clean it and check the size according to a new gadget. Moreover, preserve the battery cable for further use, damaging it results in the worst installation conditions.
In another way, above the dashboard is also a suitable location, and the presence of an electric passage decides the installation procedure.
For these fitting procedures, protect sensitive electronic tools like radio.
Install the mounting bracket
For the permanent adjustment of a brake controller, push it in the desired spot and mark spots. Also, drill holes for the supporting bolts, screws, and gather tools for their appropriate tightening.
Moreover, consider the mounting bracket as a template for the holes and adjustment of the small tool. Next, drill holes with an electric machine, follow the spots of mounting brackets and access the fastening process.
To avoid unnecessary damages, remove the dashboard panel, keep it aside, and protect the behind tools.
Fasten the brake controller
With the drilled holes, adjust the mounting bracket on the spot, add fasteners and tighten them.
Next, identify the types of screws, and for tapping screws, push them inward.
Moreover, for other standard screws, use the efficient screwdrivers, adjust them, and tighten them gradually. Also, avoid excessive tightening because it results in damages to the dashboard.
Furthermore, tighten the bolts with specific tools, check their adjustment, and remove technical problems.
Connect plugs with the power supply
To plug the gadget directly in the vehicle, use the brake controller wiring harness. Also, move one side of the electric wire to the lower direction.
Next, connect the built-in harness to the controller wire end, join them firmly, and proceed to further connection.
Utilize brake controller wiring kit
For the wiring of the electric brake control, utilize the RV electric passage, determine the cords and mark them. Next, select the blue wire and move it to the controller on the dashboard lower portion.
Following the passage, it should run from the controller to the built-in connector. Next, connect the grounded electric wire with the chassis.
Moreover, preserve it by moving back to the negative terminal of the RV battery, use the current checker, press it on both wires, and check the presence of electric current.
Also, check the connection with the brake pedal and maintain the power switches in the best conditions. To make this connection, use specific tape, cover the wires and stabilize the passage.
In addition, develop a connection of electric wires with the adjustment of breakers one after the other. For example, in an RV battery, 20 amp and 40 amp breakers support the performance.
Next, join one end of a 20 amp breaker with the positive terminal of the RV battery, and connect the other end with a black controller wire.
Also, join the 40 amp breaker with the positive connector and move the other end to the built-in connecting point.
Here is a pattern for the wire adjustments on the brake controller
Mark them with numbers, then connect the first wire near the emergency brake pedal, under the dashboard compartment.
Also, connect the second and third cord near the center console and within the junction box. Finally, push the fourth and fifth joining wire behind the storage pocket and access panel, keep it above the ashtray.
Fix the sixth wire near the brake pedal, and for the last two wires, select the spots near the emergency brake pedal and storage pockets.
Test brake controller performance on different speeds
To test performance at different speeds, drive RV at numerous speed conditions. Moreover, replace the controller in case of any negative impact because RV depends on it.
In addition, with no installation skills, consult with expert mechanics, and get permanent control on brake pedals.
Can you install a wireless brake controller in an RV?
For fixing a gadget, a specific RV wiring is necessary, but few vehicles lack it. However, a new wire connection is the best option with the particular brake controller wiring harness.
Moreover, several brands offer these wireless tools in an affordable price range, and their size depends on customer selection. For these setups, connect the built-in Bluetooth to the brake control and your smartphone.
Also, the wireless connection is reliable and requires an RV blade and a high volt battery. Furthermore, to utilize the blade, maintain the battery voltage of more than 12 volts.
What are the different types of RV brake controllers?
A brake controller divides into two prominent groups, and both of them have appropriate control on the brake system.
Furthermore, it is a stable or time-delayed device with an estimated power requirement.
Also, it depends on the towing vehicles, their weight, and speed to stop. Moreover, a signal travels from the controller to the central brake system and the vehicle stops with a pre-determined intensity rate.
For a proportional brake controller group, a sensor detects the brake rate, duplicates the similar deceleration, and performs with brakes. Also, these tools are efficient for one-stop after a stop because they slow down the vehicle as per instructions.
Why would you install a brake controller in your RV?
For the efficient performance of electric brakes, these devices are essential, with maximum control. Moreover, the electric over hydraulic system utilize the moments to access towing weight, and brake actuation happens.
Furthermore, the electric system does not work without them. Also, vehicle towing is challenging, and the absence of notification and no data processing happens when an RV lacks them.
Is it legal to drive an RV without brake controllers?
To drive an RV with an electric brake and no controllers is not legal because the driver loses vehicle control.
In America, for a trailer of more than 4000 pounds, these gadgets are essential. Moreover, above 45% to 50% towing weight requires them, and the violation results in fines and punishments.
What is the average cost to install an RV brake controller?
For installation, the cost varies with the size, complexity, and type of the item. However, on average, the overall process costs you around $250 to $370.
However, the electric wiring also affects the total cost, and with no specific passage, further additions happen. Moreover, it costs between $370 to $380, and item quality rises.
Furthermore, in complicated installations, the labor costs around $310 to $340, which rises according to the situation. However, it is a costly process with reliable results and maximum performance at numerous speeds.
For an experienced person or mechanic, the process is less time-consuming due to expertise and professional knowledge. Also, on average, to install it, a person takes around 4 to 5 1/2 hours, and time increases due to inappropriate skills.
Furthermore, the complexity of the procedure increases the time to 6 1/2 hours. Also, patience, control, and precise comprehension of wire coding make it easier and less time-consuming.
Related Articles:
Do I need a Dura Faucet in my RV?