
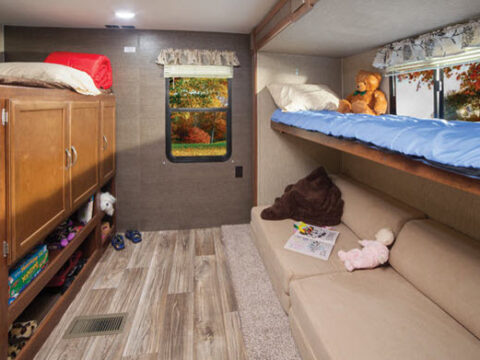

RV has good sleeping areas for different family members. The bunk bed is the best solution for providing enough sleeping space for your children.
How to Make Folding Bunk Beds for RV? Most RVs have foldable bunk beds setting in the dinette area of slideouts. You can remove the accessories of the dinette and open the folded bed, and place cushions on them that can serve the function of a mattress. You can also make a removable top bunk bed in the dinette area by adding frames that hold the bed in its place securely.
These beds usually accommodate two to three children or young adults that makes them suitable for large families.
They can save maximum floor space inside the RV. You can also utilize the bottom area of the lower bed for storing different things in it.
How to Make Folding Bunk Beds for RV?
The foldable bunk beds are the type of bed in which two beds are stacked on top of each other to form a single sleeping unit at night.
You can easily lift off the foldable bunk bed assembly during the day. The slideout area, the closet, and the camper’s rear rig are the most suitable places for installing them.
Large RVs have unique floor arrangements for installing two or more bunk beds with the camper’s walls, also known as the bunkhouse of the trailer.
The dinette area inside the RV slideout can easily convert into bunk beds by removing its accessories.
For this purpose, you need to remove the table leg from its countertop. After that, remove the cushion and backrest from the dinette seats. The Pullman bunk is usually present on the backside of the seats.
Pulling off the top of RV bunk bed
It would help if you held the top and the bottom edges of the Pullman bunk bed. Now roll the assembly in such a way that it moves towards you.
It would be best to hold the Pullman bunk assembly in the middle to protect your fingers from scratches that occur due to lifting it from its sides.
The underside of the bunk bed contains little snap fasteners that held the bed’s covering to its original place.
You need to detach them from both sides, pull the top covering from it, and flip it.
While flipping the top covering, make sure that you pull the curtains out of the way.
Now, attach the popper with the slideout wall on both sides. You can add the backrest and the cushions of your sofa seats on the top bunks that fulfill the purpose of the mattress.
Making of Base bunk bed
You can make the base bunk using the top of the dinette table. Now slide the top of the table in the central space between both seats of the dinette area.
After that, add another backseat and cushions on the bottom bunk for making a soft and comfortable mattress.
Safety guard rails
Some camper contains guard rails for installing them on the sides of the foldable bed. You can also make a new guardrail for your top bunk; they are easy to install.
For making a new guard rail, measure the length of the bunk bed. Take 3/4 inch of cherry wood and cut it according to the size of the bunk bed with the help of a woodcutter.
Now attach some long wooden pieces at the end of the guard rail to help them mount on its sides.
The top bunks also contain some attachment points for fixing the ladder. The ladder must be strong enough to carry the weight of young adults.
Make an easy-to-remove bunk bed in the dinette of the RV
You can also make a removable the setting on the top of the dinette area. It will help you to use your dinette for both sitting and sleeping purposes.
When you close the slideout, it does not create installation problems that affect the space in RV.
You can make slight modifications to your RV according to your needs. One of them is installing it in the slideout to help you adjust your children’s sleeping area. For this purpose, you should open your slideout for extra space.
Now measure the area of your slideout dinette with the help of measuring tape. Remove the dinette table and all the backrest and cushions from the seats.
Making of the top bunk bed
It is essential to measure the width and length of your lower dinette bed for making the new removable bunk bed of exact dimensions.
You need to add some wooden frames to the side window and dinette area. The frames help to mount and hold the top in its place.
Modification inside the window
You need a 3/4 inch cherry wood to make the frame on the side window.
Mark the wood according to the shape of your side window and then cut it with a jigsaw; after that, you need to smooth out its edges.
Mark screw holes on the wooden piece with a pencil according to the screw slot of the window.
After that, drill the whole assembly and attach the wooden piece with the window frame using long stainless steel screws.
Make the frame of the bed
You need two sheets of 3/4 inch plywood for making its base and cherry wood of 4 quarter inches for making a frame around this sheet.
It will make the whole assembly of the bunk bed strong and prevent them from cracking.
Cut the plywood according to the length and width of the lower dinette bed so that you make two platforms from it.
The inner platform must have the width of the side window so that the window frame holds it firmly.
For adding the outer platform of the bunk bed, you need to add two frames on both sides of the dinette sets. These two frames lift and secure the external platform and prevent them from falling.
The frames have the same height as the side window bracket to prevent installation errors.
Safety of the top bunk bed
You need to fix these platforms of the top bunk bed on the frames firmly. For this purpose, you can make a drill hole in the assembly and attach removable fasteners to it.
You can also use t-nuts and bolts to install and remove the top platforms in the frames.
The bolts help secure the bed assembly in the frames and prevent it from falling due to any mishap.
Ensure that the frames that hold the outer platform are strong enough to carry the weight of a young adult.
You can also secure these frames with the slideout walls and the dinette seats using different screws. After that, add removable safety rails and a ladder in the top bunk for safety purposes.
Making of lower dinette bed
After making the top bunk bed, you need to fix the table in the middle of the dinette seat. Add backrest and cushions on the top of the lower dinette bed.
Mattress recommendation
You can make it more comfortable by adding a mattress in them instead of cushions and backrest.
For this purpose, measure your bunk bed’s exact length and width and purchase the mattress of the same dimensions.
The mattress of RV comes in different styles; you can choose them according to your budget.
You can also add some decorative things around the area and place some colorful sheets on the top of the bunk bed. It will make the whole site more appealing and beautiful to your children.
Can I build an RV bunk bed on my own?
Making a new bunk bed inside the RV without the help of professionals saves a lot of your expenses. It is a family task because you require some physical assistance during the installation and building process.
You can involve your partner and children in this task to make it more enjoyable and create some good memories from it.
You can also use some online ideas for making bunk beds of different styles that can increase the aesthetic appearance of your camper.
There are different low-quality wooden and metal products available in the market that are inexpensive to buy. But it creates many safety concerns inside the camper by increasing the risks of injuries due to poor installation.
On the other hand, the expensive one can easily get damaged after some time of use. The manufacturer’s defect in them also increases the chances of mishaps.
You can also use different good-quality materials with unique colors and textures according to your preferences.
Related Articles:
Do I really need a tankless water heater in my RV?