

Travel trailers at camping sites remain still for extended periods resulting in rusting of their wheel bearings due to condensation.
Moreover, lubricant grease also has a useful life, after which, it deteriorates and becomes less effective.
Therefore, repacking of wheel bearings is required after a regular interval, as recommended in the owner’s manual.
How to Repack Travel Trailer Wheel Bearings? Repacking the travel trailer wheel bearings involves cleaning the old grease and feeding the new one for proper lubrication to avoid rusting. In conventional systems, you need to remove wheel hubs and seals to access bearings. While with the EZ lube system and Bearing Buddies, you can easily do it by refilling grease using a grease nozzle available from outside the wheel.
How to Repack Travel Trailer Wheel Bearings?
The wheel bearings repacking procedure is straightforward, including removing wheels and locking systems to reach them, applying grease, and reinstalling them.
This periodic preventive maintenance will enhance the useful service life of bearings and other components and ease the travel trailer’s movement.
Tools required
- Trailer Jack with stand
- Paper/cloth towels
- Gloves
- Torque Wrench with a socket to fit lug nuts
- Impact Wrench
- Hammer
- Wooden blocks
- Wheel bearing rated high-temperature grease
- One seal for each wheel
- Locking pins
- Brake parts cleaner
- Grease gun
Apply Jack to lift the tire
The first step is to lift the trailer above ground on the relevant wheel side with a jack’s help to remove tires.
Park your trailer on a plain surface with other wheels chocked from the opposite direction of the lift to avoid its movement.
Next, place the jack with its stand on a stable surface like a block of wood or brick under the camper’s frame and operate it up to the desired height.
Remove the lug nuts
When the tire hangs freely above the ground, the next step is to remove it. Use torque or impact wrench to unscrew all 5 lug nuts by holding the wheel to prevent its rotation.
In the case of a torque wrench, you should loosen the screw before applying the jack to avoid its movement while removing nuts.
Remove the wheel
After removal of nuts, pull the tire on the outer side to remove it from its place.
Place it on the ground with the inner surface up to provide access for easy cleaning on the wheel hub side.
Unplug the dust cover
The first part visible on the wheel hub assembly after removing the tire is the dust cap.
It prevents the dust from entering the bearings and mixing with grease.
Carefully remove it by gently hammering it or with the help of a chisel to avoid bending it.
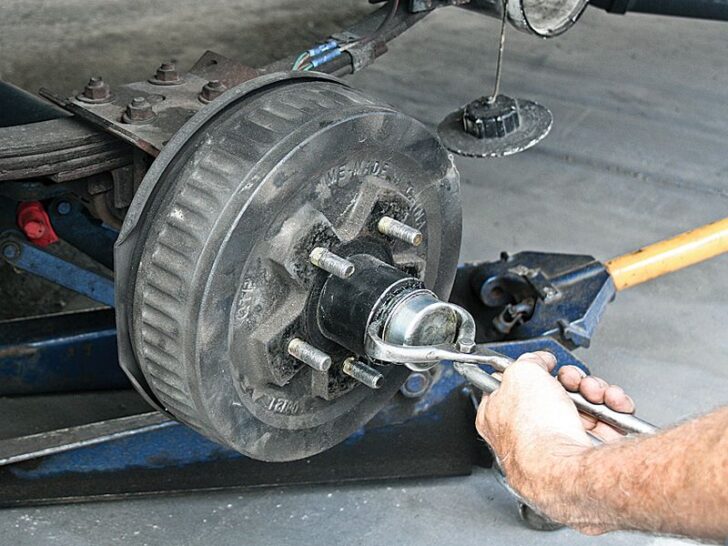
Unscrew the bearing nut and its locking key
The next step is to remove the bearing nut restraining clip. It can be in the form of a castellated tab, cotter pin, lock washer, or a cage holding the nut in its place.
Whatever the arrangement can be, gently pull it with the help of a flathead screwdriver to access the bearing nut. After removing the holding clip, unscrew the nut with your hand.
Remove the Wheel Hub
Removal of bearing nuts will allow you to remove the wheel hub and brake drum assembly because they come fabricated as a single unit.
Gently pull it and place it on a towel with the inner side up to do cleaning and remove bearings.
Remove both bearings
There are 2 bearings in the travel trailer wheel, one on the inner side and the other on the outer side, to facilitate its movement.
The outer bearing will be free in its place without any locking mechanism. It will quickly come out as soon as you remove the hub.
The inner bearing has a locking seal to avoid leakage of grease in the brake chamber. Remove it with the help of a seal puller.
It is for one-time use, and you need to replace it with a new one after removal. Pull the bearing out to clean and inspect it for any wear and tear or damage.
Clean the bearings
As both bearings are out, the next step is to clean them of the old grease or any accumulated dust.
Roll the bearings in paper or cloth towels and gently rub them to wipe the black oily spots on their surface.
During the cleaning process, inspect for any worn-out or damaged surface of bearings due to excessive use.
In case of worn-out or cracked surfaces, replace it with the exact match having the same dimensions.
Wipe old grease from the drum and spindle
Use a paper towel to clean the inside of the drum to eradicate the old grease.
Avoid spreading it on the drum surface as it will result in the loss of friction required for braking operation.
But if you get any greasy spots around inside the drum, clean it with the help of the brake cleaner spray to remove it.
Also, remove any residual paint and any traces of the old seal that we removed earlier.
Thoroughly clean the spindle for traces of used grease and accumulated dirt on its brake assembly end. Use brake cleaner to clean brake parts for any rust or dust on their surface.
Apply the grease on trailer wheel bearings
Repack the bearings after thorough cleaning of all parts with the help of a grease gun or manually.
Take a lump of grease on your gloved palm and scrape it with one side of the bearing to insert it inside.
Keep on doing it until new grease starts popping out from the other side of the bearing. It is a tedious job to keep on doing it manually.
Apply the new grease inside the hub
The next step is to apply grease inside the hub both from the inner and outer sides to have a nice layer for frictionless movement.
The spindle should also have a thin layer of lubricant but remember to protect brake parts from any traces or spots from your hand or grease gun.
Reinstall the bearings
First, insert the inner side bearings and its washer. Install it in the direction that its narrow cone-shaped surface should be down or opposite the side of the grease seal.
Similarly, install the outer side bearing with the large diameter side outwards and the conical side inwards.
Install the new seal Inside the Drum
After installing the inner bearing, the next step is to install the new grease seal inside the wheel hub.
Place it on the hub surface and gently tap it with a hammer on the edges to insert it straight.
When the seal starts moving in there, place a wooden block spanning the seal on top of it and hammer it until it is in level with the hub.
Reinstall the brake drum/hub assembly
Carefully reinstall the wheel hub on the axle spindle without colliding any parts.
Take special care for outer bearing as it is free in its place with the help of thick grease and can fall out.
After inserting the wheel hub, check it for free rotation to ensure alignment of all parts, especially grease seal.
Reinstall the bearing nut, restraining clip, and dust cover
Insert the bearing washer, bearing nut, and its restraining clip in an orderly way to prevent any misplacement.
Apply a thin layer of grease on these parts to protect them from corrosion with time.
Tighten the bearing nut with the help of channel locks until you feel resistance. Slightly loosen it to prevent too much strain on the bearing and ensure free movement of the wheel hub.
Install the dust cover by gently tapping it with a wooden piece and hammer until it tightly fits in its place.
Adjust the tire and tighten the lug nuts
Reinstall the tire in its place and tighten the plug nuts with torque or impact wrench.
Check the tire for free movement and also for any play due to loose nuts. Make an arrangement to prevent the rotation of the tire while inserting nuts.
Now remove the jack to move the trailer tire down on the ground. An important precautionary measure is to torque the lug nuts up to the range specified in the user manual using a torque wrench with the tire on the ground.
It is essential from a safety point of view and prevents any damage to the axle. Moreover, check the operation of brakes and make their adjustment if required.
Repack the travel trailer bearings with an EZ lube axle
The wheel bearing repacking procedure for trailers with EZ lube axles is a lot easier, cleaner, and faster.
It does not involve the removal of any parts like wheel hubs to access bearings.
It has a special metal fitting inside a seal known as grease nipple or grease zerk to feed the lubricating grease inside to axle spindle and its parts with the help of a grease gun.
● Lift the tire with the use of a jack and remove it.
● Remove the rubber seal on the wheel hub with the use of a flathead screwdriver.
● Attach the handheld grease gun nozzle to zerk fitting and pump the grease while continuously rotating the wheel hub.
● Keep on pumping, and you will see old grease coming out around the spindle sides.
● Keep on cleaning the old grease and pumping the new one inside until you see all new lubricant coming out.
● Remove the nozzle and wipe out the extra grease from the dust cover.
● Reinstall the rubber seal. Use the new seal if the first one gets damaged.
● Reinstall the tire and remove the jack. Tighten the nuts up to rated torque.
● Some EZ lube systems even don’t require removing the tire for repacking procedure as zerk fitting is accessible without removing the tire. However, using a jack is mandatory to enable rotation of wheels.
How to grease your trailer bearings with bearing buddies?
It is an alternative for the EZ lube system with a spring-loaded piston to avoid over greasing.
It has a grease fitting accessible outside the wheel hub under a protective covering to repack the wheel bearings.
How often?
You should consult the owner manual for range or duration for preventive maintenance of wheel bearings.
It is recommended to perform the repacking procedure after 8 to 10 months for good performance and extended life of bearings and axle spindle.
Cost
The cost of repacking the bearings includes purchasing grease, labor cost, and cost of replacing parts.
If you go to a workshop, they will charge around $200-$300 for the whole procedure for all four wheels.
However, if you do it on your own, you only have to purchase grease, grease seals, or replacing bearings. It will cost around $30-$50, and you can save a lot of money in terms of labor costs.
Related Articles:
How to make folding bunk beds for RV?
Are RV tankless water heaters worth it?
What are the Best RV Outdoor Speakers?