

The underbelly is the covering that is located underside the travel trailers. The main purpose of the covering is to provide protection and insulation. It is made up of various materials depending on the type of the trailer. Moreover, it also protects the small critters that can get inside and cause serious damage.
How To Remove Travel Trailer Underbelly? You can remove the travel trailer underbelly by parking it on a stable ground surface and using the stabilizers. Locate the screws and nails that are mounted at multiple locations. Clean it to remove dust from it, and use the drill machine or screwdriver to remove the screws and nails. Cut the underbelly material with a razor knife or pry bar and pull it.
You have to remove the underbelly to find the water leaks and make necessary repairs. Moreover, I did this because it was damaged and caused the little critters to get inside. I replaced it with a new one using the same materials. However, you can seal or patch the damaged part instead of removing it completely and replacing it with a new one.
How do you remove the travel trailer underbelly?
Underbelly removal from the travel trailer is an easy procedure, and I also did this in about 1 to 2 hours. It is a handy method, and you only have to unscrew their mounting screws and nails.
I required less time because the skirt area was not secure with the screws, and it was only bent from the corners. I did not hire a professional and got help from my partner. Many people consider this procedure irritating because you have to crawl under your trailer.
Park and stabilize the trailer
Park the RV on the stable ground surface to remove the underbelly. Parking them on a flat ground surface is necessary to reduce the chances of their sudden movement.
Wheels can roll forward and backward when you park them on inclined and poorly leveled surfaces. Moreover, some trailers do not have enough ground clearance so that you can access the underside protective and insulating coating.
You have to raise the frame to get inside and unscrew the bolts. Use the jacks to increase the ground clearance and raise the trailers.
Moreover, you should also place stabilizers to support the frame and for safety concerns. I also placed the stabilizing jack on the sides and middle of the frame to provide additional support. I also used the wheel chocks to reduce the sudden rolling of the wheels.
Locate the screws and nails
Underbelly is mounted beneath the travel trailer with several screws and nails. You have to locate all these screws and nails so you can unscrew them quickly.
I also determined the screw size and type so I can use the tools according to them. I checked the edges and center of the frame to locate the screws and nails.
I did not find any screws near the skirt area, and it was secured with glue. Moreover, I did not see any nails in my trailer’s underside to secure the insulating layer.
Clean the underbelly
I preferred to clean the underbelly so dust could not get inside my eyes. Moreover, you can also wear the safety goggles to protect your eyes from the dirt and small debris.
It is the underside of the trailer and is full of dust and dried mud because of the dirty road surfaces.
You can use the pressurized water to remove the dust from their surface. I connected the water hose to the main supply valve of my home and washed it thoroughly to clean the mud. I waited for about 30 to 40 minutes and left it to dry.
Remove the screws
I used the screwdriver to remove the smaller screws that are located in the center of the underbelly. Moreover, the screws that were located on the edges have larger diameter, so I used the screw wrench to unfasten them.
Moreover, you can also use the drill machine for the screws that are hard to remove with a screwdriver or screw wrench. You can only unfasten them with a drill machine because of their overtightening and corrosion presence near their sides.
Some of these screws are hard to remove because of the presence of contaminants and the sticking issue. You require a drill machine to unfasten them quickly without extra effort.
Connect the drill machine with the electric supply and set the nozzle to unscrew the bolts.
Some travel trailers also have pins to secure the underbelly completely. You can carefully detach these pins with the pry bar. I collected the self-tapered screws and put them aside so I could use them for reinstallation. However, you can discard the nails because they can get bent during detachment.
Cut with a razor knife
Underbelly is adhered to the underside of the travel trailer with screws and gluing material. You have to cut the insulating sheet with sharp material to remove it.
Use the razor knife, carefully cut the sheet from the middle, and then move towards the edges. I cut the holes on their sides and then pulled them.
Proper cutting is necessary for completely detaining their flaps because these can cause issues during the windy season.
Why would you remove the travel trailer underbelly?
Many people do this when it gets damaged completely, and you cannot seal or repair it with patching.
Moreover, water leaks from the tanks and plumbing system are common, and it is necessary to address these issues because they can increase the humidity and damage the floor.
You cannot identify the water leakages because of the presence of the insulation layer. You have to detach it to find the water leakages and repair them.
My friend told me he removed the underbelly of his trailer last year because he wanted to make some changes to the electricity system.
You have to do it to replace the damaged electric wires with new ones and identify the short-circuited wires. Many people perform this to replace damaged plumbing pipes with new ones.
You can also drop it to clean the electric connections and treat the frozen water lines.
What is the material on the underbelly of the travel trailer?
The underbelly of travel trailers is made of different materials depending on their model and manufacturing industry. Most of these are made of corrugated plastic, resistant to weather and several road conditions.
However, installation of the ones made up of corrugated plastic is difficult because of the wavy appearance. It can also lead to poor sealing, which causes the small insects to get inside.
You can also see their polyethylene material, which is resistant to harsh environmental conditions and extreme heat. Furthermore, some of these are manufactured with reinforced plastic material, and you can drill or glue them for fastening.
Things to consider
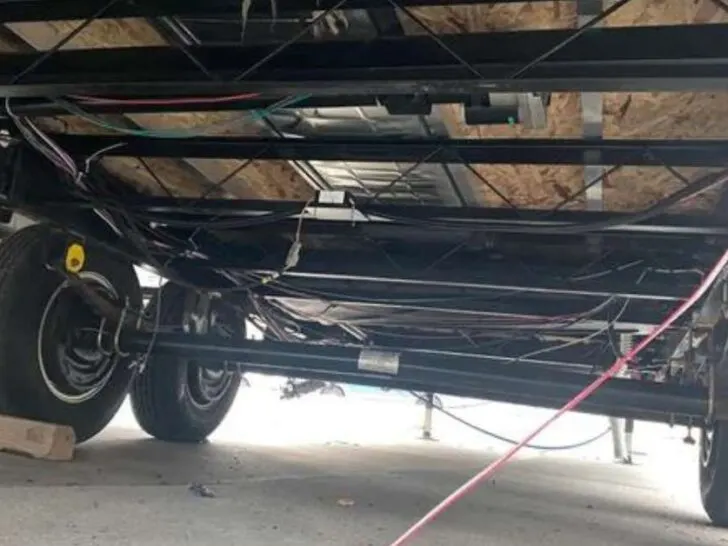
The trailers have several connections located on the underside, and minor negligence can damage the sensitive parts and lead to significant repairs.
You can see electric wirings and plumbing pipes there. You should cut the underbelly carefully to reduce the risk of damage to the electric wires and plumbing pipes.
Moreover, sometimes it is better to take photos or make short video clips of the screw assembly so you can see it for the reinstallation procedure.
Inspect the type of screws, fasteners, or nails that are used for their mounting so you can select the right material for their reinstallation.
You should use the razor knife carefully while dealing with adhesive material. It is better to consider the weather conditions while doing this to make the process simple and easy.
Related Articles: