

Replace the blown-out head gasket by removing it from the engine and welding it between the head and block in the Honda Civic. Due to the complexity of the procedure, its average replacement cost is $1020 to $1300.
How to Replace a Head Gasket on Honda Civic? You can replace a head gasket on a Honda Civic by peeling off the old gasket with a sharp blade, removing the radiator’s fans, and draining the hose. Remove the exhaust manifold, wiring harness, distributor, and plugs. Install a new gasket by adjusting it at the valve’s bottom, weld it between the engine block and cylinder head, tighten the bolts and reassemble the removed parts.
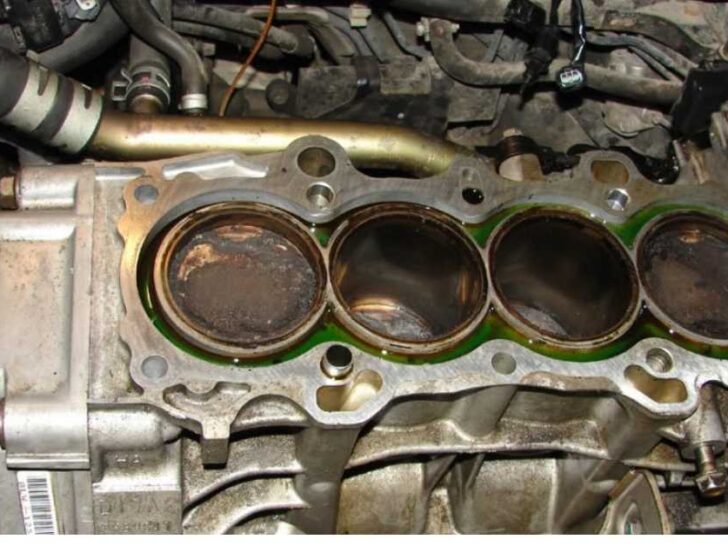
Inadequate coolant flow, high temperatures, and excessive usage lead to its replacement. As a result, it malfunctions and reduces the compression inside the cylinder.
What is a head gasket on a Honda Civic?
In combustion engines, the head gasket is a seal between the engine block and the cylinder head. It prevents the penetration of oil in the cylindrical compartments.
It seals the combustion chambers and produces compression to maintain the engine power. Also, it protects from leakage of coolant and improves combustion.
It directs the toxic gases towards the exhaust system and produces power to push the car forward. In addition, it maintains compression through the spark plugs for standard combustions.
What is the method to replace a head gasket on a Honda Civic?
Its replacements take 7 to 17 hours, and labor can do it in 5 to 7 hours. For replacement, a blown gasket takes a few days, and a valve assembly consumes 7 to 10 hours.
Find and remove the old head gasket
Find it between the block and cylinder head. It is a vital part of a specific design. Open the hood and access it by cleaning the upper surface.
Hold it manually, pull it in your direction and peel it off. Then, use a sharp cutter or razor blade to remove the sticky parts.
Adjust the blade under the leveled equipment and remove it. Never damage the mounting spot of the cylinder head, and keep the block intact.
Clean and prepare the block
Take a fiber-free fabric or a rag, apply an enamel cleaning agent on it and rub it over the surface of the block. Next, mix alcohol with water and wash the deck.
Also, rub a soft and bristle-free brush on the challenging areas. Finally, remove the dirt particles, carbon traces, and debris.
Approach all the stud threads and head bolts that connect with the cylinder head. For re-installation, lubricate them with a high-quality oil.
Reduce the friction between the cylinder head and the block. Lubricate the bolts for reassembly and correct tightening.
Remove the air filter
To remove the radiator fans, detach the radiator assembly from the system. Next, hold the air intake hose and remove it from the fans.
Remove the middle intake that combines the carburetor with an air filter. Adjust a container under the hose and remove the mounting brackets of the fan.
Drain the hose in the container and collect the knuckle in a separate bucket. Remove the air filter, keep it aside and proceed to the next step.
Remove the exhaust manifold and distributor
Find the exhaust manifolds in the hood, adjust a wrench over four bolts, rotate them anti-clockwise and remove them.
At the connector, approach the O2 sensor and disconnect it. Next, remove the bolts and loosen the head of the manifold.
Find the three bolts that connect the header pipe with the manifold. Loosen the bolts and remove the mounting bracket.
Next, lift the manifold, remove it from the frame and keep it aside. Finally, find the harness, pull it manually, and remove it from the system.
Fit a screwdriver on the locking tabs to release them. Next, remove the bolts of the distributor assembly and make the rotor visible.
Mark its position and put the screws to prevent their loss. Loosen the distributor and never disconnect it from the engine.
Remove wires, plugs, and heads
Find the nuts that hold the manifold with the cylinder head. Under the port of intake, remove the central nut with a 1/4 inch extender. Remove the two connecting bolts and detach the manifold.
Remove the valve assembly by pushing it against the bolts. Next, hold the spark plugs, and pull and remove them.
Then, remove the grounded electric wire from the circuit. Remove the timing belt and pulley one by one. Adjust a 1/2 inch socket on the head and unbolt it.
Adjust a pry bar between the block and the head. Detach them and purchase new equipment with optimized compatibility.
Install the new head gasket
They adjust with the head and engine block through welding. Before installation, remove the trace of old equipment with a sharp blade.
Scrape off the retaining particles of aluminum and clean the mounting spot. Then, adjust it on the lower portion for valve assembly.
Adjust it on the mounting area slowly and push it back toward the head. Clean the bolts and nuts with a fiber-free cloth and remove rust with a wire brush.
Then, replace the broken and cracked bolts. Next, lubricate the internal threads with oil dabbing. Next, insert them into the valve assembly and tighten the bolts in their standard positions.
Reassemble the removed parts and re-tighten the nuts and bolts. Fix it between the block and head and secure it with screws.
Why would you replace a head gasket on a Honda Civic?
Overheating and insufficient coolant flow affect their performance. Following are a few significant reasons for their malfunctioning.
High temperature in the engine
Due to insufficient coolant in the engine, the internal temperature of the engine rises. Excessive heat blows them within a few minutes.
A malfunctioning thermostat reduces the flow of coolant. A high heat level inside the engine affects the rotational parts and leads to their replacement.
Wear and tear due to excessive use
With time, they lose their appearance and work efficiency due to several combustions. In addition, it causes internal wearing of the metallic components and requires a swap.
Low level of coolant
A broken water pump, malfunctioning hoses, and damaged radiator reduce the coolant flow. It leads to their failure and requires immediate replacement.
Leakage of oil
Engine oil leaks in the cylindrical heads block due to constant exposure to vibrations and heat. The seal cracks and causes the abrupt leakage of oil.
Premature failures
Lack of lubrication results in premature failures of the head gasket. Its replacement becomes necessary because you cannot repair these internal faults.
How do I know if my Honda Civic has a blown head gasket?
Dropped levels of the coolant increase the temperature inside the engine. Due to overheating, the exhaust produces white smoke.
A clogged radiator and its malfunctioning fans indicate a blown gasket.
The reduction of engine power and contamination of oil notifies about the blown gasket. A gasket blows and reduces the compression in the cylinders and is prominent at idle speeds.
Related Articles: