

Here are 6 easy steps to replace the door window frame in your RV. The window section helps to increase the lightning inside the vehicle. You can also change its frame if it’s broken or damaged.
How to Replace RV Door Window Frame? RV door window frames are available in two pieces; you need to change both pieces together. Remove all the screws present in the interior structure, detaches the edges from the window section. Clean the surface, add the new exterior frame in place of the old one, and screw it with the interior one.
The RV entrance door has a small opening in which a window and its frame attach. The window installs give your RV a lot of fresh sunlight and provide some privacy to the vehicle.
You can easily replace the old entrance door window frame with the new one. However, the continuously changing weather affects these window frames harshly.
As a result, they become discolored or rusted. It will decrease the aesthetic appearance of your RV.
Consider that the first impression is the last one, and keep your RV exterior surface and entrance window case shiny and free from rusting and discoloration.
How to Replace RV Door Window Frame?
Sometimes the RV door window frame becomes rusted and worn out from its sides. It is high time to change it because it will affect the appearance of RV if you do not treat them on time.
This damage happens down due to ultraviolet radiation coming from sunlight. The frames are available in the market as a two-part structure.
The outer case is used to build on the exterior side of the door. The inner frame is attached to the entrance door.
You can buy any part of this frame, but it is better to replace it when you purchasing both pieces together.
The process to replace the window frame is simple, and you can efficiently perform the whole task at home.
Remove the screws
Most of the windows attached to the entrance door have obscure glass that decreases your camper’s overall configuration.
The window frame starts to fade, or cracks appear in them due to the continuous presence of natural elements like sunlight.
They usually have separate screws for mounting the frames in the door.
Some of these come with distinct shades to install on the inside to keep your trailer’s environment pleasant and comfortable. To replace it, simply remove all the screws that hold it in the window compartment.
There are no screws present on the outside; they are present on the interior side to put pressure on the outer case by firmly attaching it with the internal frame.
Remove all the screws using a cordless drill machine having a turnscrew bit. Approximately 12 screws are present in the old case; remove them so that you can quickly remove the internal part.
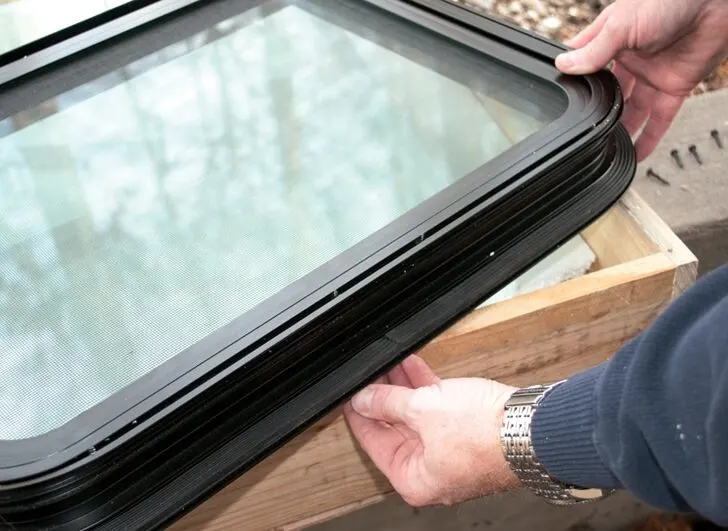
Now push the window frame’s outer side slowly in a backward direction. Do this step carefully so you do not cut yourself from the glass’s sharp edges and protect the window from falling.
It is beneficial to replace and install the window case with some help.
Clean the area
Clean all the frame compartment surfaces with a good cleaner. If there is some sealant present, remove it with some alcohol and a flat scraper.
The next step in the replacement process is preparing the new window to fit the door compartment.
Use clips and adhesive
If your new window comes with the shade, then the interior frame has some modifications. First, the upper side has some thick slabs to attach and hide the shade in it.
Some clips are present in the broad slab to attach the shade with it. Attach the shade’s handle into that little clips and stick some adhesive in it.
It will hold the shade in place when you are mounting it. Once you connect both the frames, they can also give strong support and prevent it from falling.
You need to add some adhesive tape on the outer case and glass assembly to protect it from slipping when you push it inside the compartment.
Install the New door window frame
Place the window’s outer case in the center of the window section and press the case from its corner in a forwarding direction firmly.
The caulking around the window frame also helps in holding it firmly. After that, attach the tape in its corner; it will prevent it from falling in an outward direction.
The adhesive tape also keeps the whole structure in place when you try to fit the interior frame in it.
Tight the screws
After that, take the entrance door internal frame of the window, hold it with the exterior one, and attach the screws.
Ensure that you use screws that come with this frame assembly.
These screws are mainly composed to settle both frames without applying pressure.
The frame does not bear high pressure, and cracks appear in them, so you need to be careful while fixing the fasteners.
Attach all the 12 screws in each slot with the screwdriver and remove all the adhesive tapes you use for the safety of the frame. Now check the shades and the window frame one more time.
You have completed the process of adding the new frame to the RV window door.
Things to Consider when installing new RV door window frame
Some factors need to consider while replacing your old window with the new one.
Use tempered glass
The tempered glass is installed in your RV. In addition, the manufacturer installs tempered glass inside the entrance door to prevent serious injuries.
Tempering is a process in which the cut-to-size glass is cooked in the oven to make it stronger and make it less harmful during accidents.
When this glass shatters, it will break into small round pieces that will cause minor damage to the camper.
The glass inside the frame is also available in different varieties like frosted glass, acrylic glass, etc.
You can also use acrylic but do not use the cheap ones. The low-quality and inexpensive glass can easily break due to temperature variation. Lexan glass is a good alternative for the replacement process, but it is the most expensive one.
Frames with UV protection
The new frame of door windows has UV inhibitors that protect them from fading.
It also supports the whole window structure; the entrance door window can open and close with the frame’s help.
They are easy to install inside the entry door and are available in different sizes and shapes to increase RV’s aesthetic appearance.
The exterior frame deteriorates more rapidly than the interior one because of the continuous availability of nature elements. Therefore, you can easily replace the exterior one; it will save your expense on changing the whole frame.
It is recommended to change the window exterior and interior cases at the exact time to prevent installation problems.
Every exterior edge attaches to the internal frame because of unique screw slots and their unique dimensions.
Get help
The installation of a new door window frame requires some assistance.
There are at least 12 screws present the hold the whole case firmly. Your helper needs to secure the old exterior frame while removing all the bolts.
Your helper also needs to protect the external frame with glass attached to it from falling while installing a new one.
Sealant in the entrance door
You can also add a layer of a suitable sealant around the window frame’s whole compartment.
It also helps protect the door from deterioration by incoming moisture and fills all the gaps and holes.
You can add an adhesive layer between the exterior frame and glass assembly.
It will make the whole assembly firmer. It also prevents the separation of glass from the external frame after some time of use.
Related Articles:
How to keep RV decals from fading?
How to make RV tires last longer?
How do I connect my Propane Grill to my RV?
How to replace RV countertops?
Easy methods to stop RV windows from rattling