

Many people are confused about the location of their RV backup cameras. In this article, we have added 8 great ideas to help you mount the security camera on your RV.
Where Do I Mount My RV Backup Camera? Mount the RV backup camper under the clearance lights and on the driver’s side. Adjust it on the bumper and above the license plates, and adjust it for vast background views and uninterrupted signals.
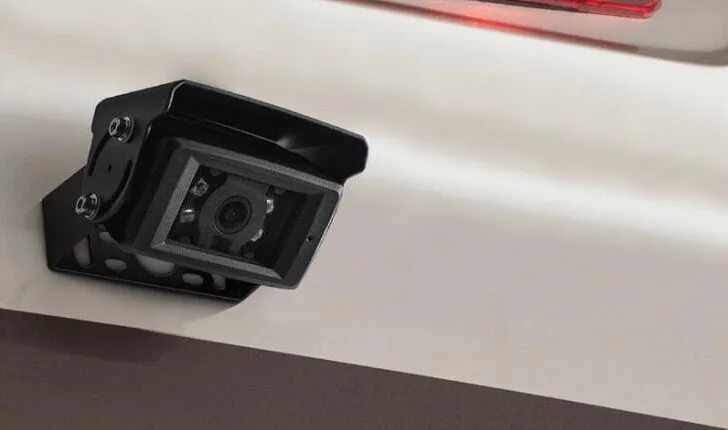
The RV backup camera is an electrical tool. It arrives with wiring, and a few of them are wireless. They prevent massive vehicles like RV from reversing accidents.
Where Do I Mount My RV Backup Camera?
These are beneficial to protect the external body of the RV from road damages. These cameras capture signals and send them to the internal screen panels.
You can get the background view without getting out of the massive vehicle with these tools.
Mount it under clearance lights
The mounting of a backup camera under the RV clearance lights is one of the best options. These clearance lights are at the rear and backside of the massive vehicle.
Few models of these structures also comprise the lights on both sides. You can choose the back portion to mount the backup camera.
It is a location that offers maximum height to the camera. There are minimum chances of angle disturbance at this spot. The clearance lights are higher, and you can settle the camera right under one of them.
Always choose the middle light and maintain a specific distance between both devices. It helps in accurate installation and keeps the electrical wiring apart.
The mixing of these passages is not suitable for the causal functions of the camera.
The device receives all the possible signals of the background. It sends signals to the monitoring device inside the vehicle. You can reverse this massive structure without getting out of it.
It is a beneficial structure for the internal and external layout.
The mounting of the backup camera under the clearance light protects it from environmental hazards. It remains safe from the rainwater and constant striking of sunlight.
You can take the help of a friend to carry out this process because the spot is high. Always clear the surface before mounting such devices because they have sensitive machinery.
On the driver’s side
Choose the driver’s side to mount such electric tools. Adjust the cameras on the higher levels by following this direction. It is a beneficial place to mount the backup camera.
The device offers a vast and clear background view. Keep the movement towards the back portion.
Select the rear wall of the driver’s seat on a massive vehicle. It can capture maximum signals from behind the road.
It prevents reversing accidents and other harmful conditions, and you can also move the camera to the back portion in the same direction. It is a step to capture a maximum number of signals.
The images and view become vast on the internal screen. Make sure that the distance between the screen and camera is moderate.
The signal absorbing capacity of the camera enhances due to less distance from the roads. It also controls few view signals from the surroundings.
The wall mounting on the driver’s side is suitable for the driver. He can get maximum information through these electrical tools and mirrors.
The focus remains on one side and direction, and the path of the signals gets clear and uninterrupted with these mounting procedures.
Never decrease the distance of the camera in an upward direction.
The higher the device stays, and you can get maximum coverage of the backside and reversing positions.
The device remains stable during the process because the wiring connections are stable. It is a suitable mounting technique for a backup camera because it comprises easy installations.
Mount the RV backup camera on the bumper
People choose the bumper to install the backup camera. It is one of the most suitable points for such installations.
The structure of the electric tool comprises a lot of metal material. These bumpers are usually of metal material.
The whole body of the bumper has metal inside and outside. These spots offer maximum support to each other.
These mounted cameras offer reverse views, but the mounting level is low. Keep it high on the bumper. Add a supporting material of metal to this structure.
Add the camera to this tool. The approximate distance must comprise 7 to 9 feet. It is a distance from the ground, and bumper distance adds to the calculations.
You can get a clear and uninterrupted view on the screen panel.
The backup camera dictates many crucial situations. It gives alarms and other signals on the monitoring device when another massive vehicle is about to strike it.
It is a safe space because the bumper protects itself and the massive vehicle.
There is no interruption in the signaling capturing. It is a bit lower than other mounting places, but the performance never decreases.
The manufacturers keep the built-in design suitable for such mounting conditions, and the bumper provides support to the device against random road jerks. It protects the external covers of the electric tools.
A spot that covers the entire view
Select the right spot that is higher and stable for the backup cameras. It is a spot at any corner or middle of the RV.
Always consider the mounting procedures before moving towards another space. Check stability and distance from the monitoring device.
These tools work in coordination, and you cannot keep them apart. Select a location on the backside.
It is a suitable camera mount setup for that RV that has no camper on the back portion. The monitoring device and camera remain close. There are minimum chances of signal interruption.
Use a ladder to reach a higher level, adjust the camera and one spot to check the signals and angle of view.
It is a spot of your choice, and you require more precautions. The stability of the surface is also essential because free-moving cameras are not suitable.
They control the structure, but the signals are a blur. Add a covering device to the camera to protect it from surrounding problems.
Above the license plate
Mount the backup camera above the license plate, these spaces offer maximum security due to the presence of built-in screws.
The RV structure remains stable and secure during the installation process, and the spot provides security from making any holes.
Replace it from this spot and install it backward. Few models comprise the number plates on backsides.
These locations are more suitable with minimum effort. You can mount the device right above the license tool. Keep the level higher as much as you can.
It is beneficial to capture maximum signals of the backside view. There are minimum chances of any interruption in the view quality.
Maintain a right passage between the monitoring device and backup camera. The spot offers a vast angle to get the surrounding appearance.
It is suitable to prevent reversing accidents and protect the massive vehicle as much as it can.
The minimum modifications make the procedure less time-consuming. Few efficient tools are essential to maintain the already existing setup.
On the middle RV surface
The middle spots on these structures are excellent to get vast views. Always select a location in the backside of the massive vehicle.
You can also choose a middle section on the rear side. Mounting the camera on the front spot keeps it closer to the monitoring devices.
The connections of signals remain firm and secure every time.
It is suitable for those backup cameras that have high ranges to capture view signals. These spots comprise attachment capabilities for the supporting tools.
The modifications can damage the front of your massive vehicle, and then select a backside location. Keep the mounting on the central surface.
It usually does not require any supportive stand for the angles and views. Keep it higher as much as possible, and mount it below the roof surface.
These setups are efficient to offer all the essential information of backside roads. You can read and acknowledge signals on the internal screen of the monitor.
Prevention of massive vehicles increases after such arrangements.
How do the RV backup cameras work?
These are of two types, and both are efficient in their performance. The wired backup cameras depend on the electric wire connections.
They have complex and tricky mounting conditions, and the wireless signals depend on their internal machinery and layout.
They provide uninterrupted view signals to the screen panels due to their unique arrangements.
What are the advantages of the mounting RV backup camera?
There are enormous advantages of the backup cameras of RV. Few of them are safety, protection for Reversing conditions, excellent view.
Safety
These backup devices offer maximum security to the RV from various accidents. It keeps all the parts safe and also protects the surrounding road vehicles.
Helps to reverse
The backsides remain safe in case of reversing conditions. Few turns are tricky, and the cameras send signals to the monitoring devices and save them from hazards.
Excellent view
RV backup cameras provide uninterrupted and excellent views to the driver. They have an uninterrupted connection to offer background information.
Related Articles:
How to install a wired backup camera on a travel trailer?