
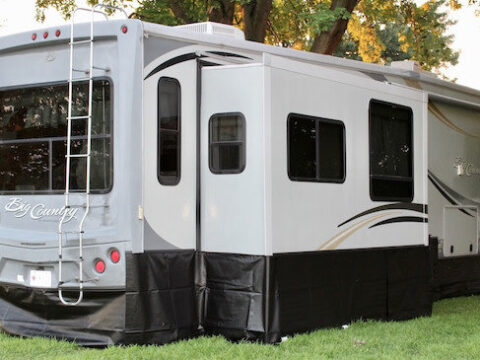
Skirting is done to secure RVs from severe outside conditions. If your RV is not covered, it is vulnerable to extreme cold and cannot sustain for camping.
How Do You Attach Skirting to an RV? You can attach skirting to an RV by marking its location, press the adhesive studs, install and secure these with snap caps. Next, you can fix it with the twist lock fastener and adhesive snaps. Finally, you can hang it with hooks installed with your skirting and secure these hooks.
Hence, you require an appropriate but secure environment to sustain. In addition, it provides comfort for you to tolerate harsh weather while you are on a camping spree. There are plenty of ways to attach these. For instance, you can secure it with hooks installed and entangling these hooks on the marked surface.
You can attach skirting by tying it up with a motorhome, using fixation tapes, or secure it along with your motorhome. In this way, a pre-fabricated channel frame can install along with your recreation vehicle to fix it around it.
This part is best for these because it can protect the cold air enter beneath it. Not only prevent the cold air but also keep the entire temperature warm. In addition, it prevents the freezing of water lines and tanks.
How Do You Attach Skirting to an RV?
In chilly weather, you need a warm temperature and reduce cold wind passage and prevent heat loss.RV skirting also maintains the water temperature around 33 degrees Fahrenheit by protecting the freezing of plumbing systems, water pipes, and lines.
For storage in cold weather, you can winterize the plumbing system of your motorhome. The manufacturer tries its best to manufacture these that work well in all four seasons.
Tools required to attach skirting in RV
There are some essential tools use for its attachment in the motorhome. It includes:
- Power drill when you use studs
- Isopropyl alcohol when you use the adhesive studs.
- Pencil for marking
- Scissors pair
- Tape measure
You require a kit that helps measure the size. In this case, determine the correct measurement of that area which need. Then, according to the dimension, decide which is the best option.
Add hooks to entangle skirting
There are numerous ways to attach it. One of these techniques is to install hooks right along with the bottom of your recreation vehicle.
Later, entangle it in these hooks so properly fix and not disassembled by jolts of any vibration in the vehicle.
These hooks are installed on all four corners of the vehicle body, with some additional clips added to ensure stability and efficacy in adverse weather.
By tying-up skirting with the RV
This technique is simple and easy to do. In this method, you need to attach a string with its parts then tie up those strings tightly with the bottom of the recreation vehicle. For this purpose, you must take utmost care.
Twist lock fastener
Twist lock fasteners allow you to do the same job in less time with fewer cuts and slotted holes. In addition, it is the most common technique to help to attach it.
In this case, both ends of the snap connected, one with RV and another with fabric.
Its attachment or adjustment is different, like some need drilling and other adhesive tapes. Secure the bottom of it to the ground that prevents cold air passage.
Mark the location and install the stud
Where you want to adjust the fastener, mark the location above it using the pencil marker. Secure each point of the fabric with the stud at the start and end of it.
If you are using the self-tapping screw stud fastener, you do not need any marks on the motorhome. You make sure that these are not too tight. You can put a small amount of silicone behind it to seal the stud hole if necessary.
In the case of EZ snap adhesive studs, you have to clean the area properly with isopropyl alcohol. This strategy is best to avoid any contamination and oxidization.
Press the adhesive studs
You should clean the mounting surface, apply primer, and then press the adhesive stud over that place around your vehicle. Press hard for a few seconds so that it is firmly attached.
The stud that installs on the surface attaches the EZ snap pins on it. Press it for a while until it fit on the fastener and repeats it for each.
Fix skirting on your RV
For you to properly attach it, make sure you have an attachment kit and a screwdriver.
Along the one end of the RV, you should stretch out the skirting. The installation is easy when you have the proper size.
For each additional joint, you can use Velcro that is best for the vinyl skirting. With the scissors pair, you have to cut it according to the proper guidelines and dimensions.
After its stretching, you should place it in its position. Then, adjust it according to the height of the fastener.
Using an EZ snap pin, puncture the fabric so that it can attach to it. Proceed with this process in all the areas which needed.
Make sure that caps lock properly and pins groves are visible clearly.
Keder style awning track
It is also best to skirt your RV. Keder has a core and fabric. The method their skirting connects to your RV is also unusual, as it uses a Keder type awning track.
Its installation is simple and easy, so you need heavy-duty adhesive tape and few studs.
Foam board
You can install foam board insulation across the motorhome. You can get it from Home Depot at a reasonable price, around $20 depending on the size.
These are lightweight, but you should care about the thickness, which is enough to stop them from blowing away.
RV wind skirting
It is suitable for hot and cold weather conditions. In addition, it overcomes the problem that occurs due to blowing sand.
These are also best to protect heat loss and plumbing systems.
In this way, hot weather conditions or the sun can harm your vehicle tires, and it can become a protective shield.
The material used in that type is thin and lightweight.
In extreme winter, you can shift toward the heavy-duty option. You can attach it with the snaps.
Vinyl skirting
Vinyl skirting comes with the best specification, and you can install it by a professional expert or yourself.
The cost of it is around $1000 to $2000, but some people use alternate solutions to make DIY skirting. These are convenient, have various colors option, avoid damage from holes or studs, eco-friendly, and recycle.
EZ snap skirting
The company can give all other relatable accessories when you buy it, including vinyl roll and hardware.
They also provide many attachment options, including adhesive snaps, snap and screw combinations, and screw-in boat snaps.
Plywood RV skirting
Plywood is cost-effective, high in durability, and readily available. You cut it according to the requirement after measuring the dimension carefully.
Join the pieces and seam up with the sealant, then screw all these into your motorhome.
Install inflatable skirting
It is unique, as indicated by its name, made up of vinyl that inflates electric air pumps. You can position it by applying pressure rather than attach by any studs or fastener. It is the easiest way because it does not require studs or adhesives.
Time duration for skirting installment
Installation depends on the material or types you buy and the exact information or idea about your vehicle. Service professionals take time for proper measurement of the entire area.
With the service center assistance and skirt kit, it can complete in a few hours. However, you want to save money by doing it yourself, and this procedure will take at least a day.
The essential step on which its fixing depends is the proper adjustment of the snapping. If you know the dimension and measurement of your motorhome, then start to attach the fastener.
Secure RV skirting from extreme weather conditions
It has a large surface area that is susceptible to more wind exposure, so you should protect it from any damage. When the wind becomes trapped in it and can’t get out, it might cause harm.
You must overcome this problem to avoid any difficulty. Use Velcro that seals the seam where two edges of skirting join.
Pipe frame made up of PVC plastic pipe that protect from the bad environmental condition. Then, put pressure behind it for better attachment.
How much does it cost?
The overall cost depends on various factors like trailer size, skirting type, and installation way. If it has low-quality material can cause a disturbance, and you face a problem when you mount it.
However, high-quality items are preferable due to their various specification but are expensive.
Cost starting from a few hundred dollars to thousand dollars; for example, vinyl skirting is around $1000 to $2000.
Related Articles:
Using an electric blanket in my RV
Common causes of smoke from RV battery
Adding RV windows to my cargo trailer