

Putting a peel and stick backsplash on the walls of the RV is the best idea to enhance the aesthetic in an affordable approach.
You can choose between several designs, materials, and shapes of these tiles or wallpapers to lift the look.
How to Install Peel and Stick Backsplash in an RV? You can install peel and stick backsplash in an RV by cutting them into the size of the area and adhere along with the shape of the surface. After that, you can pour additional glue for adhesion, and finishing the edges will be your last step. They last for around 2 to 3 years, and a pack costs less than $100, but it varies with the pattern and material.
RV is your motor home, which you use for various trips, camping, traveling, and adventures, and people spend 50% of their vacation period with it.
However, you can not perform a decor makeover and up-gradation at a high level that requires holes, scratches, and strokes because of less space and limited access.
Your home on wheels represents your style and personality, and it should be equally outstanding and professionally designed.
Around 70% of the owners add these backsplashes to their RV to create a cohesive blend of different pieces and patterns.
These bite-sized chunks and pieces make you feel homier and inspired without the problem of adding grout and mess that occurs during the installation of typical wall slates.
Prepare the RV wall for the attachment of peel and stick backsplash
The preparation process consists of cleaning and making the surface free from residues, dirt, and stains.
Wait for at least three weeks if you have just painted the RV walls to let them dry completely, or the sheets will not stick.
Take a wet cloth and start rubbing it on all the areas. Clean thoroughly and scrub the area where required.
Use alcohol to remove the existing wallpaper, if any. Then, use soap water, or home cleaners to clean stains and unnecessary bumping.
Dry pat the surface or leave it for few minutes to dry.
Make sure to use cleaners which is safe for the metallic walls or panels of the RV to make sure not to damage them.
These wallpapers have a thin adhesive layer at the backing that sticks easily and firmly.
On average, you will complete the whole task within 2 to 3 hours with proper planning and assessment of the required material.
They come in a pack of 4, 5, 6, or 10 sheets, and you will need approximately 3 to 5 packets, depending upon the dimensions of the walls.
Cut them into the required size
Usually, one sheet is around 10″ by 10 inches, which is the size of an average tile, so you can cover the big area without cutting it.
First, measure each segment because all are different in size to get an overview of small sections.
Cut them according to the design, like if you have a hexagon sheet, cut it according to the flowing lines on the pattern and design.
Never cut them straight or irregularly because it will make it much different for you to continue with the next section.
Use a knife or paper cutter for vinyl sheets while you need a metal-clad or angular grinder for ceramic and metal ones.
Start sticking these on the wall
Start with the last or more tricky edge or corners so you can follow the style on the rest of the area with ease.
Keep measuring and sticking until you reach the other end and adhere from bottom to top while pressing with the hand.
Preferably, take a steel scale and glide it over the sheet on upward movement to eliminate the chances of air bubbles and crisps.
Remove and re-stick if you observe unevenness and wrinkles that interrupt the design while there is no need for such care in ceramic, metal, and glass backsplash.
Finishing edges
Your last step will be finishing and trimming every end and edge to give a uniform and symmetric look.
Do not drag onto cabinets and other installed items and trim with the flowing patterns and stripes.
Take a dry cloth and wipe to remove any debris present on them, if required and make sure to stick edges more strongly.
Can you put extra glue to stick the backsplash?
Typically, there is no need for pouring extra glue, but you can add a few drops if necessary.
Check first by softly touching the adhesion side with your fingertip to feel if it is sticky enough or not.
Add the glue and let it sit and dry slightly for 5 to 10 minutes, then adhere these to the wall of RV and keep pressing for a few seconds.
Remember, wrong adhesives will weaken the sheet and can tear them. Always use tile glue for ceramic, stone, and glass backsplash and paper glue for vinyl.
Read the instruction first because some glue has a negative impact on these, resulting in the loss of stickiness of the existing adhesives.
What designs of peel and stick backsplash can you choose for your RV?
You will find hundreds of designs and patterns from bold to light, from plain to exciting, from bricks to hexagons, and you can choose whatever your heart says.
White or neutral subway or rectangle blocks go well with literally any theme.
Mosaic is the favorite of 99% of the people because they are rich in colors and intensified in patterns.
Stripes, Catalan, herringbone, and arrows stick wallpapers descend more towards a subtle yet classic approach.
Wooden or marble faking designs, when having a 3D look, add more points to the luxury infrastructure.
Copper, rustic and metallic sheets will contrast more with pale cabinetry and structures around.
High gloss, painted backsplash covered with plexiglass are new and outstanding unless you put them near heat.
Fish scale, scallop, quarter-foil, hexagon, square chip sticky tiles add more depth and definition to the area when chosen in light shades.
Bricks’ design is the ultimate choice because of its realistic vibes.
Silica gel sheets have a plastic sheen and a unique pearl white illusion.
What are these backsplash made of?
Usually, four materials of these are available in the market, and all of them have different grace and glamour.
Vinyl sheets: These are risky ones because you never know if they will look good or bad on the walls depending upon the quality and are water-resistant and long-lasting.
Ceramic chips: These are more original and realistic, which give the feel of original tiles but are thinner than the usual ones and need grouting between the chips.
Stones sheets: these beads and stones bonded on a sheet look more natural with their 100% originality but do not go well with many home layouts and themes.
Metal wallpaper: Metal is a shiny material that appears to stand out in any area and is suitable for less use because of extravagant vibes.
Around 90% of the people use vinyl sheets because of diversity, while only 10% take the risk of adding other material in their RV.
Why is peel and stick backsplash best for an RV?
These tiles or wallpapers are perfect for your motor home in several ways, including:
Convenience in installing: their biggest advantage is the easy installation process without much effort, time, and tools.
One-touch adherence makes it thousand times feasible without messing with mortar and changes the whole look at a glance.
Stick on any surface: either glass or plywood, metal or brick wall, painted or rough area, they will stick on any surface without any hindrance.
You can cover all the mess, poorly executed wall art, and leak patches with them with just a wipe.
Protection: do not fear grease, oil splashes, and stains on the kitchen wall after installing them as they act as the barrier between them.
These are also helpful in preventing the outpouring of leaks and other spoilage in any area, typically the vinyl ones.
Easy to clean: They are one wipe away from returning to their previous glow and charm, whatever the situation is.
Wet cleaning with a nonabrasive cloth is preferable, while you can also use soap water for stubborn stains.
Lightweight: RV has a small space with a limited weight-holding capacity, so heavy materials installation like tiles and marbles will cause huge problems.
These backsplashes are lightweight and occupy not even a 1/2 inch, and you can easily tow them with a moderate towing capacity vehicle.
Reusable and changeable: You can change peel and stick sheets whenever you want by pulling them out with less force and jerk.
You can also reuse the old sheets in several other ways, irrespective of the fact that you have fewer options of bringing changes in them, but you need extra glue for adherence.
Flexibility: in my view, the most beneficial aspect of these is that they are flexible to be adjusted at every corner where installing hard materials is not easy.
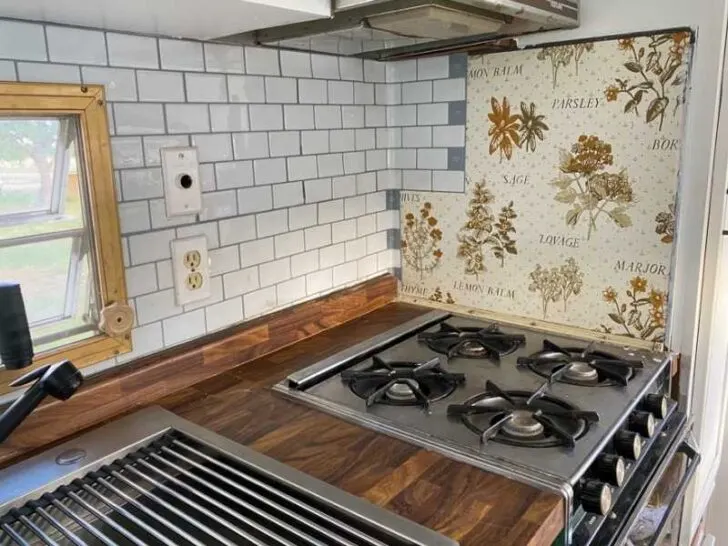
The area above the stove, surrounding the sink or basin, plumbing corners, and cabinet nooks are the most challenging section where these papers easily stick and stay.
How much does it cost to add peel and stick backsplash in an RV?
Usually, the expense depends upon the material, the design, the quality, and the number of sheets you need according to the space.
One thing that reduces much price is the convenience of doing it yourself without any expertise or professional help.
The price varies with the number of papers in a pack, and the solid pieces, like ceramic, glass, and tile, cost per sheet.
On average, the whole installation project will cost under $100 if you do a single area or room such as a kitchen or bathroom.
Few price examples for different designs and materials:
- Vinyl Hexagon white – $40 to $50
- lantern mix colored – $80 to $90
- Mosiac subway – $50 to $60
- Marble tile adhesives – $90 to $100
- Glass adhesion – $100 to $300
I installed the vinyl brick sheets on my kitchen walls, and it cost me around $400 to cover each space and corner.
How long do these backsplashes last?
No one can question their good durability as they will remain undamaged and un-bruised for around 3 to 4 years.
This look to longevity ratio is exceptional for any wall decor item, especially at such affordable prices.
I installed them two years ago on my RV, and they are still in good condition because I clean them every day with a wet cloth.
Generally, quality defines durability, and there is no doubt that the higher quality ones will go by your side a long way.
Sometimes, you will experience chipping-off and fallen tile due to the loss of stickiness and adhesive at the back, but the overall condition remains better.
Is there any disadvantage of peel and stick backsplash?
Generally, they are beneficial in many aspects, but there are some drawbacks associated with them.
Peeling off: The makers design them to remove easily without damaging the surface. They use weaker glue that is not much strong and begins to peel off with time.
It mostly happens to the edges and narrow sections where rubbing and gliding are more prevalent.
Air bubbles: The formation of air bubbles occur with time which looks awful, but the product is not responsible for this.
When you fail to smooth the surface to remove air spaces during its installation is the primary reason.
Cheap look: some vinyl backsplash look extremely gaudy and cheaper, especially when low quality.
They do not have a 3D look and depth to make them feel more original, which decreases the class of your RV, giving it a disgusting appearance.
Patches and stains on the wall: extra gluing will result in staining and scratching the metal color of the trailer.
You will need grout to fill the spaces of ceramic, stone, and metal backsplash, which adds extra mess.
Related Articles:
Is it necessary to install a battery disconnect switch in an RV?