

The master cylinder in Ford F150 is like a controller, which controls brakes when stepping your foot on the pedal.
How to Replace Brake Master Cylinder on Ford F150? The following steps are involved in replacing the brake master cylinder on the Ford F150: Prepare your truck, remove the old cylinder, place the new one, bleed the brake system and reverse the above process. Following these steps and their details in sequence can help you install a new brake master cylinder on your truck.
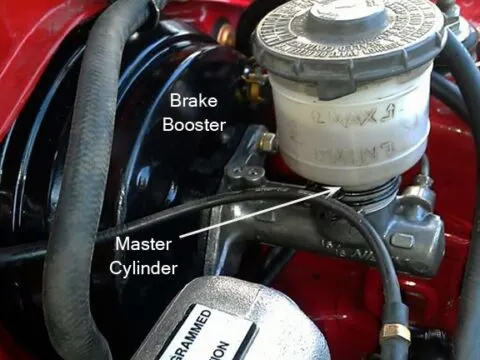
How to Replace Brake Master Cylinder on Ford F150?
Working of brake master cylinder involves the conversion of mechanical action into hydraulic action. Under this action, the disk attaches to the cylinder press pedal, which moves further with the cylinder’s bleeding air.
This bleeding air presses the stopping disc attached to the wheel. In this way, apply brakes while using the brake master cylinder.
Reasons for brake master cylinder failure
There are various common reasons for brake master cylinder failure. The most popular are spongy brake pedal rubber becomes damage.
It is an essential part of its to maintain the fluid inside the cylinder. Internal leakage occurs if it becomes worn out.
Brake pads overheating
Overheating of breaking occurs in several ways. Sometimes brakes fade when you push on its pedal and look spongy.
When you stop, you observe that smoke coming from your wheel and a burning smell produce as a result. Sometimes your brake section wears out to the extent that metal is rubbing against metal.
The lead cause of this overheating is friction, but it also happens due to various reasons. It includes improper brake pad installing, brake mechanism fail out, pads and disc excessive worn out.
Sometimes you choose the low-quality material parts, guide pin in the brake caliper become stuck.
You have to overcome this by slow down your truck and park at a safe place. You have to check regular your truck’s all-engine system.
Buy the best material parts with the reputed brand and check out the brake pads and disc thickness.
Failure of the brake rotor disc
These are the essential part to slow down your truck with the assistance of brake pads and calipers.
This impairment’s signs and symptoms can be noisy brakes, vibration, grooves appear on the rotor, stopping distance increases.
Noise produces when the rotors become worn out and warp resulting in squeezing or squealing sound produce.
Squeak occurs through wrap while worn rotor reason of scraping voice. It also happens due to padding failure: rotors that distort or damage produce irregular pedal vibration and the steering wheel. The contact of the rotor with the pedal diminish, which is also a leading factor.
Vehicle safety decreases due to rotor grooves which also increase the stopping distance. You have to replace the brake rotor disc with a new one, and the overall cost is around $15-$20.
Hydraulic fluid leakage
Within the bell housing is a short section of the hydraulic pressure tube, which must seal between the cast and pipe also at a junction in which the pump nozzle attaches.
There must be another cause is the transmission fluid level is under the side plug. It indicates that no hydraulic fluid leaking; however, it would be full.
The problem can occur when a pinhole or crack appears in the pressure line. You tight the O-ring across the pressure tube before the hydraulic nozzle. You have to remove the manifold without harm your vehicle.
Sometimes the usual transmission fluid level can allow input shaft seal leakage. You have to test the volume by a dipstick or its plug.
You can use well-reputed hydraulic stops like the blue devil and Lucus hydraulic oil booster and stop leaks.
These are unique plasticizer that does not contain petroleum distillates. These complete seal and restore the crack or deteriorate rubber seal. It is better to bleed the hydraulic clutch to fix this issue.
Accumulation of dust and dirt
The rubber inside your master cylinder collapse and deteriorate as the seal wear out leads to brake fluid contamination.
You can detect small black blotches within your fluid reservoir. If you use the best quality recommended fluid, then the life span of the rubber seal increase.
Moisture content also damages the system, which allows the grit entrance. Another cause in which liquid level is low occurs due to the brake lines leakage and allows the pollutants to contaminate. If you drive through the mud or water, it also damages your truck system.
Overfilling
Overfilling the master cylinder will not allow a sufficient amount for the brake fluid to expand due to heat expansion.
Caliper due to inflation fluid causing residual friction. You push away that piston to replace a pad and not examine the fluid level results in the same issue.
You can resolve this problem by optimum filling its level and check it properly with time. Both the low level and excess filling are the problem.
You have to check the fluid amount, which turns on the key and allows the pump to run until it stops.
Brake pedal problem
The possible cause of its issue is the brake loss and defective master cylinder. Sometimes the pedal hits the floor if no pressure occurs on it.
It happens if you are not getting enough brakes. These cannot return to their original position on their own. You have to maintain the lever and optimize the pressure so you cannot face future problems.
A step-by-step guide for replacing the brake master cylinder
First of all, you must set the parking brakes on your truck. So that it may not roll while replacing the brake master cylinder, then, open the hood and locate it.
Usually, it is in a yellow casing that you can find on the firewall’s left side. It will set the tone and make sure proper working conditions to replace the brake master cylinder on your Ford truck.
Any mishandling in truck preparation for replacement of brake master cylinder will cause irreparable damage to the cylinder assembly and the persons working on its replacement.
Therefore, you must be keen and extra careful in preparing the truck or setting it on the right platform to replace the brake master cylinder.
Remove the old cylinder from the yellow casing on the left side of the firewall
For this, you must first unscrew the bolts. Usually, the brake master cylinder attaches with two screws to discs and a yellow casing.
Removal of these two screws or unscrewing these two will bring the brake master cylinder out of its container.
It would be best to remember when you would unscrew the brake master from its casing discs attached with brake masters must not be damaged or impacted.
If discs are damaged, you have to replace the brake master cylinder and stop discs. It would be best to make sure the above precautions in unscrewing the brake master cylinder before going for its replacement.
Place the new cylinder in the yellow casing for the brake master cylinder on the left side of the firewall
Now, place the new brake master cylinder in its place and screw it with bolts. Usually, assembling of brake master cylinder in the truck needs two bolts.
One bolt screw on the right side, while the other screwed on the left side of the yellow casing. After this, connect the brake lines with the brake master cylinder. It will make sure a smooth flow of air needs to press discs against the wheels.
Reconnect electrical connections
After this, the next priority in the replacement of the brake master cylinder is to reconnect all wires which we disconnected for the removal of the previous brake master cylinder.
It will ensure a smooth power supply or flow of electric current to the brake master cylinder for its smooth working.
During reconnecting wires, you must remember these must be of the best quality with minimum resistivity and must properly insulate to avoid any mishap during the flow of current to the assembly of the brake master cylinder.
Unscrew the reservoir cap to fill the reservoir with Dot3 brake fluid
In addition to the above steps, now you must unscrew the reservoir cap. After removing it, start filling the reservoir with Dot 3 fluid meant for applying hydraulic pressure in the tank.
While filling this fluid, you must remember it must be up to the MAX line mentioned in the reservoir. If it does not reach the reservoir’s maximum level, you cannot apply the needed hydraulic pressure to the concerned brake.
Screw the top back on
Moreover, after ensuring the reservoir is full of brake fluid, now you must screw the top of the chamber to ensure that fluid may not leak during the operation of the master brake cylinder while applying brakes.
In most cases, the top of the reservoir does not screw properly, which results in leakage of fluid, and less fluid is available to apply hydraulics pressure.
Hence, bake efficiency seriously impact under such circumstances because the optimum fluid level in the fluid reservoir is necessary to ensure better brake efficiency.
Bolt the new master cylinder in its place
Furthermore, when installing the new brake master cylinder in the casing on the firewall left side, you should bolt the new brake master cylinder tight.
Usually, two bolts use to screw it in place. One bolt screws on the casing right side, while the other tight on the case left side.
While screwing the brake master cylinder, you must remember one thing that it must screw tightly, engine vibration and frequent operation of your Ford F150 will disturb its alignment and its efficiency during operation.
Jack the truck up
Now, to install the brake master cylinder into your Ford F150, you should jack your vehicle up. Jacking up of vehicle will ensure ease in working beneath the truck.
It will ensure clear sight of installment area and provide enough room for the worker to move and adjust their position according to needs assembly and handling tools used in replacement of brake master cylinder.
During jacking up your vehicle, you must remember that the jack is stable and its height is up to maximum level, supporting the best working space for the workers.
Secure the truck with a jack stand
Jack stands use not just to raise the vehicle upward but also to secure the truck with no supporting bases such as wheels during work.
Therefore, one must be extra careful in using jacks that it is stable and well placed in their position to hold vehicle during repairing job.
Sometimes, jacks are not fit in their place, resulting in the truck’s vibration or movement into and from ways. This can cause damage to your truck.
Remove the front wheel
Removal of the front wheel will ensure further fulfillment of further requirements of replacement of master brake cylinder.
Lose the round-shaped valve
After removing the front wheel, you must now loosen the round-shaped valve on the caliper’s top.
It will make sure other processes such as removal of entrapped air from the system as it will badly impact pressure exerted on discs attached with the wheel.
Removal of air in the system
Now, ask your helper alongside you to pump the pedal. The pumping pedal will ensure the removal of traces of air inside the lines used to apply pressure on the disc attached with the front-wheel and have their connection with the master brake cylinder.
Tightening the valve
After ensuring that all liquid sprayed or emitted out of the valve then you must tighten the valve back.
In doing so, you must remember this air entrapped inside line completely remove. This trapped air can reduce the pressure exerted on the disc used for applying braked.
Repeat the steps until the air remove
The above processes used for removing air must repeat until air entrapped inside lines is entirely removed.
It is an exhaustive process, but without doing so, you cannot make the sure proper and effective function of the master brake cylinder installed at your truck.
Repeat the process for other wheels
The process described for the front wheel must repeat for other wheels in similar manners. When this process repeats and duly followed for different wheels, replace the old master brake cylinder with a new one complete.
How to check the brake system master cylinder on Ford F150?
- On the top of your truck master cylinder, you have to open the brake fluid tank.
- Check the lid.
- Observe the inside master cylinder.
- If both reservoirs fill with the proper amount of their fluid, then shut off with care so that dirt cannot penetrate them.
Related Articles:
Can you replace the front brake caliper on Ford F150?
How to reset ABS light on Ford F150?
How to open broken handle tailgate on Ford F150?