

If you have difficulty handling your motorhome or have upgraded the tires to larger ones without changing the suspension system, you need to install the steering stabilizer. In some cases, you will also require to change an older one having faulty parts with a new one.
For installing the steering stabilizer on your motorhome, you will need to lift it with the help of a jack. Next, add a mounting bracket with the chassis or body of the truck to hold one end of the stabilizer. Next, fix the frame with the tie rod on the passenger side to adjust its second end. Then connect the stabilizer stop between 2 brackets. Lastly, go for a test drive to ensure alignment and proper functioning of the steering stabilizer.
What is a steering stabilizer?
Handling a motorhome is one of the challenging tasks due to its extra weight and wind gusts trying to unstable it.
As a result, it negatively impacts the tires and suspension system and causes driving fatigue. In severe cases, it ends up in death wobble leading to flipping over the vehicle leading to fatalities.
Therefore, manufacturers have designed a solution to enhance the stability of the RV and keep it straight, known as a steering stabilizer.
It also assists in keeping the vehicle balanced in case of a front tire blow-out. Moreover, it specializes in smooth steering maneuvering on bumpy surfaces or off-road conditions.
Steps for Installing Steering Stabilizer on Motorhome
Mounting a steering stabilizer is a 6 step process that is easy to do by yourself as it does not require any drilling holes or welding.
You can quickly fix them between the motorhome frame and tie rod. I suggest gathering all necessary tools and parts beforehand to ensure a smooth installation.
Lift the motorhome with a jack stand
Park the vehicle with front wheels aligned in the forward direction. The first step is to lift the vehicle’s front end with a jack stand to access the steering linkages and tie rods.
Next, use wooden chocks behind and in front of the rear wheels to stop the movement of the vehicle. Finally, remove the engine to access the chassis and tie rods if the engine has skid plates underneath.
Install the chassis bracket
The next step is to install the chassis bracket with the help of nuts and bolts. Finally, there are two bolts to secure the stabilizer unit with the vehicle chassis or frame.
The purpose of this bracket is to fix one end of the stabilizer. If you replace a faulty system, you will need to apply the WD-40 spray to make it loose by removing any rust.
Connect the tie rod bracket
The second end of the stabilizer with a flexible part and spring connects with a tie rod. It flexes with the movement of the steering wheel and tie rod and keeps it centered.
You need to install a second bracket with tie rod assembly to mount it. Next, measure its length.
Insert it inside the housing of the tie rod and fix it with the help of 4 nuts and bolts. Keep both brackets loose so that you can adjust the alignment.
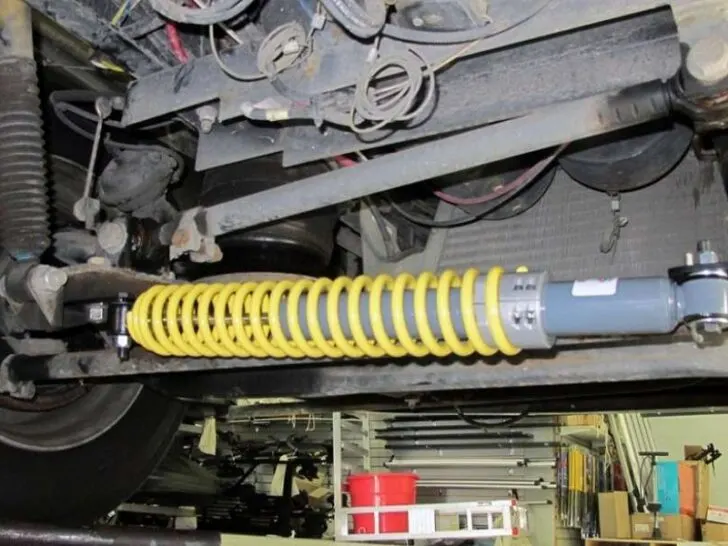
Add the steering stabilizer stop
Reflex or shock-based steering stabilizers have a tempered steel spring to extend and compress to restore the steering to its neutral position.
You will find it wrapped around its damping element or shock with a piston moving inside a fixed housing filled with hydraulic fluid.
You mount this element between the two brackets installed in the last step. Next, connect the fixed end of the damper with the chassis bracket with the help of a nut.
Next, install the spring or flexible end with the mounting assembly on the tie rod of the motorhome.
Tighten the bolts
After fixing its both ends on your motorhome, the next step is to tighten all the screws. Finally, use an impact wrench to secure the nut and bolts of both brackets.
For tightening of damper nuts, you should use a torque wrench. It is vital to ensure proper fitting according to manufacturer instructions in the manual.
Too loose or tight connections can result in misalignment or improper functioning of the stabilizer. In addition, it will lead to a skewing of steering towards one end, requiring more force to control the RV.
Test drive
After completing the installation steps, the last step is to go for a test drive and align the stabilizer stop properly.
First, lower the motorhome by removing the jack stand and wooden chocks from the front and behind the rear wheels.
If you observe pulling the steering wheel on either side, it means the steering does not have proper alignment with the tie rod assembly.
Therefore, stop the vehicle and make necessary adjustments by loosening the bracket screws. You will also need to take the motorhome o workshop after the installation process for alignment of the suspension system. It is essential for the safety and longevity of tires and the stabilizer system.
What should be the mounting direction of the steering stabilizer?
The mounting direction of the stabilizer does not matter. You can install it on tie rod links either on the driver or passenger side.
It will serve its purpose of providing damping to the steering to keep it centered and prevent oversteering.
Moreover, you can switch the spring side either connected with a tie rod or with the chassis or axle of the motorhome.
Then, whenever you turn the steering, the spring will stretch or compress and return the vehicle to a neutral position irrespective of its direction.
How often do you need to replace the steering stabilizer on the Motorhome?
Over time, the steering stabilizer gets old and becomes weak or develops problems like leakage of its hydraulic fluid. Then you will have to replace it.
There is no specific period for replacing the system, depending on its usage and driving conditions.
Death wobble can make it worn out due to excessive stress, and you need to replace it early. Therefore, check for any fault or symptoms of a bad steering stabilizer and install a new one accordingly.
In my opinion, 50,000-70,000 miles is the reasonable figure to replace them like shocks on the vehicle.
Can you install a steering stabilizer on all RVs?
You can install a steering stabilizer on all kinds of motorized RVs. Other types, including pop-up campers or travel trailers connected with towing vehicles, will not require this.
However, you can install it on towing vehicles to improve their stability and improve the driving experience. Despite the fact, you can fit them in class A, class B, and class C motorhomes.
How much time and cost does to install a steering stabilizer?
You don’t need to weld and drill holes for mounting the assembly. Therefore, you can install it by yourself within an hour.
On average, it will cost around $500-$600 for class A, B, or C motorhomes.
It contains a mounting bracket and stabilizing element with fixing screws and locking nuts. Labor cost is minimal as it is easy to install within an hour.
Dual vs single steering stabilizer
Dual steering stabilizers have the same assembly and function as a single one, but they have better performance and two shocks instead of one.
As a result, it provides more stable driving on bumpy surfaces, and damping is superior. It uses two spring and shock elements linked with tie rods on passenger and driver sides.
There is a center bracket fixed with the axle beside the differential. Due to control on both sides of the steering wheel, it has a stable operation with fewer issues.
Related Articles:
What are common problems with the Regency RVs?