

Shrink Wrapping an RV is a simple procedure; you can do this in your garage. Different auto repair shops provide wrapping services. The whole process takes 1 to 2 hours.
Can You Shrink Wrap an RV? Yes, you can shrink wrap an RV to protect it from winter. First, cover all the RV with shrink wrap and seal the pleats temporarily with tape. Then create a perimeter band around it and heat weld all the sheet and perimeter band. Tape all the folds and install vents on these sheets.
Can You Shrink Wrap an RV?
When you are not using the RV for a long time in winters or summer, its protection is of ultimate concern.
So we need to cover it with something that can protect it from all the external elements. The dirt and snow can cause wearing of the RV parts.
It can even cause freezing and cracking of roofs in cold environments. Ultraviolet rays can cause fading of paint on the roof and walls.
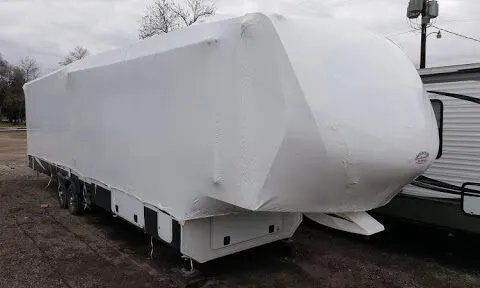
It is the best method to store the RV in the winter season. Cover it in shrink film and park in the garage or outside for the complete winter season.
It gives tight seals that keep all the snow, water, dirt, and filth away from the RV. It is more suitable than tarps covering because tarps can leave gaps between the pleats.
Snow and dust can easily pass through these gaps. Breeze can easily blow out tarps and other ordinary covers from the vehicle.
Select type of shrink film
Shrink film is a clear plastic wrap used to package different products. It is known as shrink wrap because it shrinks around the product after the application of heat. It comes in four types of plastic.
- Polypropylene
- Polyethylene
- PVC
- Polyolefin
All these plastic wraps have different qualities. Choose one of these depending upon the type of motorhome you are wrapping.
After selecting the type of shrink film, decide its form that you will use for your vehicle. Shrink wraps come in different forms, like centerfold rolls, tubing, bags, and single flat rolls.
Take measurements
Taking measurements of the motorhome is essential to determine the size of shrink fil rolls. Measure the circumference of the vehicle.
It is the measurement taken around the walls of the vehicle to know the widest point of it. Suppose the measurements are 30 20 10.
Now take the roll of shrink film and cut it to match the sizes of RV.
Cut a few feet extra to compensate for the loss of sheet during shrinking. Measure the width of tires also separately shrink wrap them for safety.
Cover RV with shrink-wrap
Cover the top of the vehicle with film and unfold it onto the sides of the RV. Spread it in such a way that it covers all the parts of it.
Carefully cover the front portion of the vehicle, in the case of half wrap, cover the front or back portion depending upon the storage area.
You can also cut two pieces of the wrap to cover both sides. Then cut the sheet from the edges to create the pleats.
These folds are essential for temporarily securing the sheet on it. Use tape to fix the folds on the edges. Do not use any strong adhesive to secure the sheet.
Create a perimeter band
Use any string or fabric to create a perimeter band around the RV. Take the string equal to the circumference of the vehicle.
Then wrap it around the circumference of it. Tie it properly in a marked position.
Try to use a colored fabric to create a perimeter band to see it around the RV. Then use a strap tension tool to secure it around the vehicle.
It will prevent it from slipping on the shrink film. Use a buckle to readjust its position on the vehicle. It will also secure the band on the sheet firmly.
Heat weld all the pleats
After creating a perimeter band, leave approximately 5 inches of material beneath it and cut all the excess film.
Now it’s time to heat weld all the folds in their respective place. You can use a heat gun or hot air welder for this purpose. Heat weld all of them by blowing hot air on them.
Heat weld the perimeter band around the entire RV by blowing hot air. It will join the band with the shrinking sheet.
After this, install belly bands around the perimeter band every 6 to 9 inches.
Make some slits on the perimeter band, then fasten all the belly band on it. Now all the film and perimeter bands are fused on the sheets to secure it around the vehicle.
Shrink the film
Now shrink the film around the RV using a heat tunnel or heat weld. Do not try to shrink the entire sheet at a time.
Go slowly and shrink one side at a time. After shrinking, check the film if required, do it another time. In the same way, shrink the film on all the sides until the RV conforms to it.
To shrink the top film, use heat tool extension and shrink only that part which you can see.
Tape all the sides
It is the final step to wrap the vehicle using shrink wrap. It will provide extra security and bonding to the shrink film.
Use tape to fix all the folds on the RV.
Then install a minimum of 4 to 5 vents per unit. It will keep the air circulation smooth. Now your vehicle is fully weatherproofed and ready for storage.
Benefits of shrink-wrapping an RV
Shrink-wrapping has many benefits that make it far more superior to other covers. Here is a brief description of all these benefits
Scratch proof
Shrink wraps are made from hard plastic that is resistant to scratches. It is more durable than a tarp or other plastic wraps.
They do not cut get torn due to scratches or cuts.
Shrink wrap can be vented
Tarps and other wraps can accumulate moisture within. These wraps will not allow proper circulation of air inside and out of the wrap but these have an extra feature of vents.
It will remove all the condensed moisture from the shrinking sheet.
Can accommodate any exterior
Different RVs like motorhomes and trailer RV have different exterior.
With advancement, all RVs have modifications like extended storage compartment bumper mounts, TV signal boosters, roof, racks, and ladder.
It can accommodate any exterior. You can cut its customized pieces to cover all the modifications or installed objects on the roof.
How much does it cost to Shrink Wrap an RV?
The cost of Shrink wrapping depends upon many factors like:
- the size of the RV
- the price of shrink film
- propane for the heat gun
On average its cost varies from $1000 to $10000. The price depends upon its width gauge type of shrink film and required length.
It depends on whether you want a full wrap, half wrap, or quarter wrap of the vehicle. A roll of shrink wrap cost approximately $100 to $200.
Fully wrapping 8 feet tall and 30ft long RV will cost $4000, it lasts for about three years or even longer with proper maintenance.
Drawbacks
Despite all the advantages, shrink sheets also have some drawbacks for us. The first and most important is its cost.
It is a costly wrap as compared to other covers like a tarp. The material labor and techniques involved in its packing make it an expensive cover for your vehicle.
You need a specific place and service of an expert to wrap it around the RV. When you are a beginner in covering it, you will need labor for this purpose.
Doing it on your own is a tedious process. Ballooning is another drawback of this wrap.
It is the entrapped air in the sheet during sealing that forms big balloons in these balloons that will decrease the sheet’s security and durability. To overcome this issue, you have to install vents at equal spaces on the sheet.
Related Articles:
Do I need a surge protector for my RV?
Why we use 6-volt batteries in RVs?
Why do RV owners cover their tires?
How to insulate an RV Skylight?
How to replace the RV skylight cover?