

Many people like to install cable-operated dump valves with their RVs. In this article, we have added 7 easy steps to do it easily.
How to Install Cable Operated RV Dump Valve? You can install cable-operated RV dump valves by connecting them with the flanges. Make sure to lubricate the valve blade and put a leak-free gasket around it. Fix the bolts in it and attach data cables with the main DC power supply of the RV. Check the efficiency of wiring and leakage of any components by turning them OFF and ON.
RV dumping system needs constant maintenance. There are three different water-holding tanks inside the RV. These tanks contain water from your RV kitchen, shower, and bathroom.
These tanks comprise two varied valves that help in dumping the waste into the city sewer. This system installs to give its user-pleasant and mess-free trips.
How to Install Cable Operated RV Dump Valve?
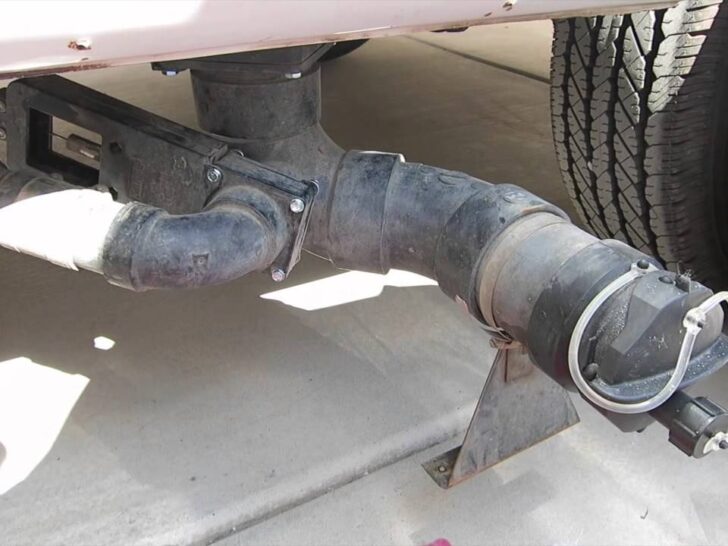
The dumping valve locates on the exterior sideboard. There are approximately two valves present for dumping, the black tank and the grey tank.
The black tank receives wastewater that comes from the flushing of the toilet. The grey tank contains wastewater for shower and kitchen use. It is cleaner than the water present in the black tank.
There are sensors present inside the camper that tells you that these wastage tanks need to dump outside.
With these valves, you can connect the hose pipe to the outlet and the city dumping system. Firstly, dump out black tank waste than grey one.
Every RV has this dumping system install in it by the manufacturer. Sometimes the valve has broken, then you need to replace this valve with the new one.
Tools required
- Wastegate valve kit
- Flange seal or gasket
- Battery-powered drilling machine
- Disc grinder
- Bolts and screws
- Wrench
- Screwdriver
- Lubricants
Cleaning of the tanks
The first is replacing the valve of both tanks is the proper cleaning of the reservoir.
It is vital to clean them because when you start to change the broken or damaged valve, all the waste material from the black one falls on you and your surroundings.
It is necessary to clean the black tank twice with the help of a sewer flush.
You can also use its water wand to accurately clean your toilet so that the clean water once again moves through the black tank and clean it more precisely.
The grey also needs proper dumping because it will start to leaks soapy water around you, and the task becomes difficult.
Increase the height of the dumping pipes to prevent the flow of anything on you.
Discard the underbelly wrapping
Most of the RVs have their dumping valves present beneath this insulation covering. It is necessary to remove this covering.
The underbelly is vital for the camper because it provides good insulation and prevents the anti-freezing of the sewage tanks.
For removing the underbelly outer covering, you need to unfasten all the bolts around it.
It is necessary to use some penetrating oil on your bolts, present in the underbelly one or two days before. It will help in unlocking them swiftly.
This task takes more time than any other process because of the fasteners attached to the covering.
You can use battery drills to open up all the bolts that attach to the underbelly insulation.
If the bolts attach to it are rusted, you need to change them with the new one. After opening the bolts, remove the valve from it.
Take out all the rubber gasket present inside the pipes to hold the valve in place. You should open its wastegate valve for one day or more to dry up all the area inside it completely.
Establishment of flanges
The flanges are essential for holding the valves in their actual place.
You can clean the old flanges with water because they contain a lot of debris and dirt.
For installation of flanges and valves, check the rubber gasket. The gasket must be intact and safe from cracks, or else it will start the leakage problem.
If the gasket damages, you can buy the new one according to the size of your new valve and flanges.
The new kit of valve also contains some lubricant that must spread on both sides of the valve. This compound will help in the sliding of the valve.
The gasket must install according to the instructions provided by the manual of the new valve kit.
The gasket must mount on the pipes of the valve and flanges.
Check the dimension of the valve and the cross member while installing them.
Makes sure that both of them do not strike with each other. It will damage your valve and the structural integrity of the vehicle.
Connects the flanges with the new valve by fixing all the new screws in their accurate area. Do not tighten the screw of the valve and flanges too much.
It will damage the plastic valve and produce cracks in it. Now attach the other valve in the grey water tank hosing the same as described above.
It is easier to install because of the presence of a rubber collar back that moves backward. After adding the valve in it, move the pipe to its original place.
Connecting the wiring of valves
After adding the new electrical valve in its place, you need to connect its wiring.
The new cable-operated valve kit has separate wiring as well as the panel of the switch with them.
You can attach the wiring of the valve to any of the electrical outlets of your RV.
Use a drill to attach the switch panel near the RV electrical outlet or water closet.
Make a drill hole in the bottom of the vehicle so that the wiring attaches to the valve can easily pass through it. Connect the wiring with the switch panel. The valve has two data cables attached to it attach them with a switch panel.
These data cables are easy to install without the need for any tools.
You can attach an additional socket anywhere inside because there are extra data cables and switches present with the kit.
You can also attach an additional switch for monitoring these switch panel activities.
Install the fuse of 5amp power for separate tanks or 10 amp for both of these tanks.
The voltage supply of this valve must be 12 volts. You can get this voltage requirement from the main power supply of the battery.
The wiring installation system can perform with the assistance of a professional. It will prevent future damages to the other electrical components.
Make sure to put grounded wire and make an accurate insulation system to protect the wiring of valves.
Checking the process of installation
It is an essential step in the installation of cable-operated valves. Check all the components of the dumping system are working accurately or not.
Turn ON the switch of the black tank and see if it’s operating well or not. Also, check the valve and the flanges connection for any leakage.
Now turn ON the switch of the grey tank and see its functionality. If there is any leakage present, remove the screws of the valve and flange. Carefully reinstall all the parts of the dumping system and also check their sealing.
Benefits of cable operated RV dump valve
There are different benefits of installing the electrical dump valves in the RV. Some of them are as follow:
Increase the convenience
The material inside dumping tanks is toxic, it can increase the chances of allergies.
If the damping valve becomes blocked, it will make the environment inside the RV smelly. Electric dump valves are the safest method to prevent all these issues.
They are easy to install and provide comfort. You can press the button and its starts working. There is no need to leave the RV and go below to install the dump hose for drainage purposes.
Indicators presence
Another good feature of these electrical valves is that there is a light present in their switches.
The LED Light indicator helps in known that the valve is open or close. It helps in preventing undesirable spillage of the material in the surrounding.
Related Articles:
How to make your own RV dump station?
How to adjust tension in RV day-night shades?
How to secure RV awning from flapping?