

Here are 7 easy methods to repair holes in the interior walls of your RV. In this way, you can also protect your RV interior components and walls from moisture and damages.
How to Repair Hole in RV Interior Wall? You can repair the holes in the RV interior wall by finding the exact reason behind these and the size of the holes. You can use wall repairing patches for small holes; fix them by using spackling compounds. For a large hole that usually develops due to moisture, you need to remove the damaged plywood and replace it.
The walls and internal structure of RV is the main component for giving it a more homey feeling.
How to Repair Hole in RV Interior Wall?
RV walling system is like a sandwich system that provides extra protection to your compartment. They are build of different layers like an outer wall, insulation, and then the internal wall.
Every layer provides extra strength and integrity to your RV. The interior walls are made of any of these three components i-e composite plywood, vinyl, and fiber-board.
The reconstruction of the interior space of the RV is a simple procedure.
You can use wall repair patches that are simply available in the market. The 6×6 repairing patch can accurately cover up every hole inside the trailer wall.
The hole in the wall occurs due to some drilling process. It can also develop from continuous hitting of the doorknob in the wall.
Sometimes due to changing the setting of your camper furniture, you accidentally hit something in the wall.
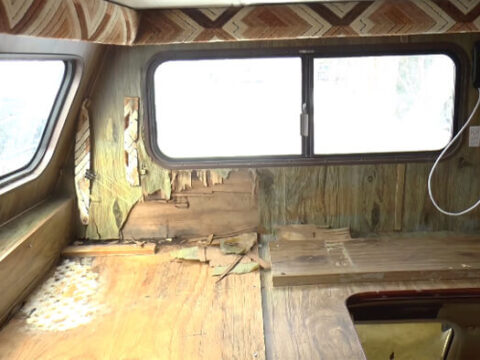
Some others of hole development are due to excessive moisture your plywood becomes so soft that it cracks easily by just touching it. The first step of repairing the hole is to find the perfect reason for this hole.
If the hole formed due to plywood harm, you need to check leakages and other reasons for moisture inside the travel trailer after treating the rift accurately.
It also depends on the size of the damaged space in the walls. The hole produces due to drilling can cover it up by using self-adhesive repairing patches.
The hole produces due to moisture is necessary to change the whole wooden panel after treating the leakage problem.
Use a patch
Smaller holes are formed due to the doorknob or by drilling, and you need to use these patches.
The first step of using them is to remove the paint or the wallpaper by sanding out the area.
So, the area becomes smooth and there is no broken piece of broken wood or vinyl component.
After doing this step, you need to spread the spackling compound over the damaged area to fill it up.
After placing this compound, open the repairing patch and place it accurately on the top of that mixture and dry it properly.
Check the patch and the spackling is dry or not, then spread the spackling compound again on the top of the patch to completely hide it.
Again sand out the surface after drying it so that the wall smoothes out perfectly. If your RV wall uses paint, try to repaint it with the same colors.
If the walls have some wallpapers, cut the wallpaper to the exact size of the damaged area. Paste it over the damaged space with some adhesive.
Changing the paneling of the interior wall
The gap is produced due to moisture and requires the removal of the whole panel of the inner compartment.
The first step is to find the leaking area.
You need to treat the problem accurately to prevent future damages. After that step, remove the damaged plywood or sawdust panel for fixing the problem precisely.
The next step in the repairing is to cover up all the things.
It is essential to cover up your furniture accurately because the repairing chemical can damage them. Now use tape to cover up the surrounding area of the damaged panel.
It will help keep the surroundings safe from the expansion of foams, nails liquid, and rust oleum spray paint. After covering everything, use rust oleum to seal all the areas or leaks.
The work is done by using rust inhibitors coated around the place.
After completely drying it overnight, do another coat of rust oleum.
After that, add the right amount of liquid nail. It works as a rubber-based adhesive that has a thick consistency. It helps in the exact bonding of the material.
You can add the insulation layer on the liquid nail in the same way as before and completely dry it.
Before adding the expansive foam, make some adjustments. Remove all the debris inside the hole and add some newspaper inside the bottom of the hole.
Now use the expanding foam only in the 3/4 area because the foam expands after harding. Let the foam hard for about two and a half-hour later use a knife and cut out the extra foam.
Again do the same process to precisely fill up every hole or gap and leave it overnight for complete drying.
Before adding a panel in the front of the insulation, add some construction paper to it.
Measure the dimensions of the area and then cut it by using a jigsaw accurately according to them.
After fixing the construction paper, spread liquid nail on it and attach the plywood panel to the damaged area.
Repairing of the holes inside RV bathroom wall
The hole that appears on the shower wall of the camper needs a slightly different method. You can find out the soft spongy place on the wall.
It is the place where leakage occurs. Treat the reasons behind it accurately.
Now turn off the water supply of the bathroom, for this reason, remove the shower panel. You can find its location in the manual.
After discovering it, and disconnect the hot and cold pipes feed that supplies water in the bathroom. Remove all the accessories related to that damaged area.
Remove the board of the shower wall, the shower area does not have small panels on the wall. You can cut the top portion of the shower wall.
Sometimes there is a bracket present that holds the fragments toward the enclosure. You can locate it by panel gaps and then lift it.
Measures the exact dimensions of the shower panel and replace it with the new one. The new shower replacement enclosure contains installation techniques that you can follow easily.
Walls of composite plywood
They are usually present inside the higher or middle-price RVs. They are made of several sheets of wood that are compressed together in a compact form.
It helps to increase the aesthetic appearance, the wooden panels also give the vehicle a homey look.
Another benefit of these plywood sheets is that you can change paint and wallpapers according to your own choice.
It gives a compact walling structure that why it is hard to bend or break them. It can only get damage due to the presence of condensation.
The moisture will increase the mold production inside it. The molds make them weaker and increase the chances of cracks in them.
Fiberboards for RV interior walls
These boards of fibers are low in weight as well as expense. This walling structure builds of sawdust that compresses together with the help of powerful adhesives.
The outer side contains a wood cover that gives its more strength. The wood veneer is compressing with sawdust with the helping of glue.
Most vehicles carry this type of walling structure because they are light in weight and more reliable.
The only disadvantage of this walling material is that they begin to deteriorate with time.
The damage starts to occur in the glued sawdust. It is changed after some time to prevent excessive damage to the interior compartment.
Interior wall made of vinyl
It is build of plastic. There are affordable and available in different varieties. They are more reliable and can present in a variety of forms, textures, and hues.
They are also economical, and there is no risk of damage from moisture and mold production. They converted into different shapes.
There is no need for special equipment for cutting and install them in the vehicle. They are low in price, and you can buy large pieces of them for making your interior wall.
The only disadvantage of this walling structure is that they tear away quickly. They do not have a long life and can damage easily without two to three years.
Why are holes in the RV interior wall?
The two causes of the development of holes inside the RV interior are moisture and drilling. Moisture can increase the growth of mold.
Molds are present in the atmosphere and find humid and dark places for their reproduction. The inner surface is the best medium for this purpose.
It is closed and parked in a cold space to protect its outer compartment. As a result, moisture trap inside it and cause excessive mold production.
You can fix this problem by installing good ventilation or by opening windows for some time. It will help in protecting your walls.
The materials are not enough for using drilling and hitting nails and screws in the wall with a hammer.
The material inside the walls is build of a thin layer of wood or some plastic.
It will easily break if you put extra force in drilling the wall.
The damage is so excessive that you need to change the whole panel of plastic or wood material.
Try to find another safe method to hang something on the wall to protect it from holes.
Related Articles:
How to repair travel trailer exterior wall?
How to repair RV bathroom faucet?