

The Ford F150 cabin air filter is necessary to remove the toxic materials from the structures.
They have a vital role in the removal of dust and other such material. The tool comprises a net, and it requires cleaning.
How to Replace Ford F150 Cabin Air Filter? In general, you can replace the Ford F150 cabin air filter by removing the glove box. First, remove the screws and then handle the surrounding tools and discard the old filter. Finally, install the new cabin air filter and tighten it with screws.
How to Replace Ford F150 Cabin Air Filter?
I have described 6 easy steps to replace the cabin air filter of the Ford F150.
The cabin air filter of a Ford F150 comprises the electric supply for performance. Therefore, it is essential to cut off the electric flow of such instruments before starting the process.
Detach the negative and positive ends of the ford f150 battery. Make sure there is no electric passage in these appliances. Leave the Ford F150 for at least 10 to 15 minutes to cool down.
You cannot touch the machinery of the air filter without turning off the appliances. The avoidance of such instructions can lead to problems.
Disconnect the glove section
Access the glove box section on the dashboard area. First, remove the internal accessories of the glove box.
You can disconnect it from the dash area or keep it inside. Empties the internal stuff and cleans it.
The empty glove box provides access to the backside system of the glove box. You have to access the air filter by removing the glove box.
Remove its screws
Approach these screws and adjust the screwdriver. Loose and remove them from the structure and keep them aside.
They are beneficial for the further installation of the devices. Unhook the glove box from the dash section and pull it in your direction.
You can perform this process by sitting in the driver or passenger seat. First, stabilize yourself on the sitting setup and then detach such compartments.
It occurs inside such structures and remains attached to the backside of the dash area.
It allows clear visibility of the cabin air filter and its housing. The assessment is necessary to remove the old parts from the dash area.
Handle surrounding tools
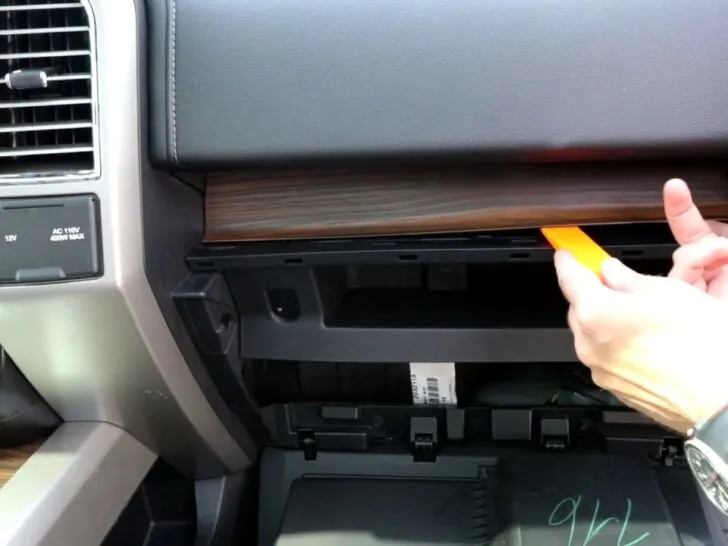
The cabin air filter housing comprises a cover. It secures the cabin filter from various surrounding hazards.
The housing and cover of the filter retain two hooks. These hooks are in the form of clips.
You can open them by applying a specific amount of strength. Use hands during such procedures because the interference of a tool can lead to various damages.
Insert fingers on the backside of the dash area. You can wear protective gloves when you feel the warmness. It is due to the presence of electric energy in such a compartment.
The disconnection of the electric passage makes the procedure secure. Push the clips with your fingers and allow the housing to pop out of the dash compartment.
The unhooking of such tools is necessary to detach the device completely. First, remove the clips or keep them in their original state. Then, disconnect the structure from this compartment and lose it for further activities.
Hold the edges of the cabin filter cover. Pull it outwards and keep the movements gentle.
The excessive amount of strength can lead to the breakage of the system.
Discard old filter
The removal of the cabin filter housing and ifs cover reveals the inner compartments. Therefore, you can access the old cabin air filter after such procedures.
The removal of the old device only requires manual strength. You can pull and remove the preexisting filter.
The filter compartment comprises this structure, and you can pull it with expertise. Never harm the cabin filter compartment during such activities. The stability of such sections is necessary for the installation of new devices.
Install new cabin air filter
Adjust the new filter in the preexisting filter compartment of the Ford F150. There is an arrow on the new filter, and you have to insert it with professional guidance.
Make sure that the direction of the arrow is towards the roof of the Ford F150. It is an accurate way to insert such tools inside the filter compartments.
In alternative ways, the device does not move inside the structure. The arrow on the new device is in the form of a print. There is no other purpose for this identification sign.
They have sliding abilities, and they adjust in the filter compartment. Adjust it on the front edge of the filter section.
Slide it inwards and apply a specific amount of strength. Again, it is beneficial to adjust it inside the dash section of the ford f150.
Adjust it firmly and then check its stability. You can check the movement of such structures manually.
It is suitable to reduce any errors before a permanent installation. The process protects from future errors and also reduces time.
Rearrange everything
It is the final step of the replacement process, and it requires rearrangement of everything.
The adjustment of the housing cover is necessary during such procedures. You have to insert it back in the original state.
The adjustment of the cover is convenient because it does not require any tools. You can push the lid in the spots manually. Check the accurate placement of this covering over the filter housing.
The adjustment of the glove box is also necessary after the installation of the cabin air filter.
First, push it backward on the upper side. Then, lift the glove box and proceed to the standard position.
Take the help of a friend during such rearrangement activities. Adjust the screws in the glove compartment. Use an accurate size screwdriver and tighten them in a precise place.
Ask a friend to hold the system during such procedures. Next, attach the clips back and then allow the electric flow.
Related Articles:
How to replace the fuel filter on a Ford F150?