
We have added 9 easy DIY methods for cleaning the fuel injectors on your truck. You can do this at home by following the techniques mentioned here.
How to Clean Fuel Injectors on Ford F150? You can clean the fuel injectors on the Ford F150 by locating its position, use a cleaning kit, remove the boost controller vacuum line, clean the injectors, and secure the wires.
How to Clean Fuel Injectors on Ford F150?
Before starting this process, wear protective glasses to protect your eyes. It also makes your procedure easy, relaxed, and comfortable.
You should wear rubber gloves to help save your skin from dirt, debris, oil, or grease. Never put hard gloves; they make the entire work more difficult and unable to move your hands.
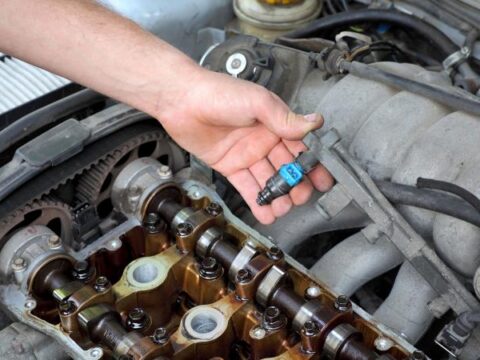
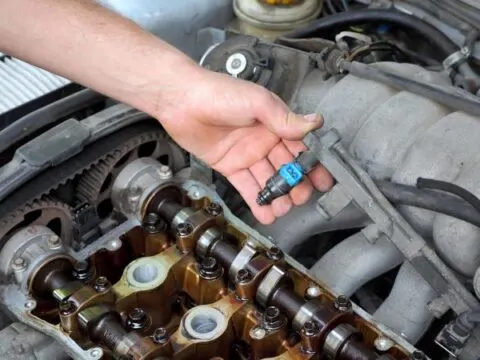
Find the location of the fuel injector
Different pickups have different engine locations, so it is not easy to find the required device. Every vehicle has a particular manual or description book that tells you about the vehicle parts with their diagrams.
Always follow your specific book that comes with your Ford. In some pickups, gasoline devices are located below the hood of the pickup.
Use the cleaning kit
You should take care while buying a cleaner kit and make sure it is accurate for the required purpose. It should contain an oil rail, polyether amine(PEA) base liquid, and a hose connected to the device.
The PEA liquid is very operative and effective to dissolve or eliminate carbon more efficiently than other fluids. You can also it to maintain other parts, you can replace the Ford emblem on your pickup for a better look.
It works well to save from a new carbon deposit but can not fix the existing material. The kit is available in an auto store, or you can also buy it online. It costs around $100 each.
Module types of petrol injector cleaner
Three modules are polyisobutylene amine, polyisobutylene, and polyether amine.
- Polyisobutylene is known as PIB; it can be used in diesel injector cleaner.
- Polyisobutylene abbreviated as PIBA, it works properly with moisturizer. It has the same functions as polyisobutylene works. It crumbs off the residue, acts as a detergent, and deposits from the gas line. It helps to decrease the machine lock problem and also fit misfiring.
- Polyether Amine has known as PEA, and it is used to eradicate substantial deposits that hinder run-line and adequate flow.
Remove the boost controller vacuum line
Some vehicles have space lines, and some do not have; read the instruction list carefully, and find the vacuum line.
If your pickup has this feature, you should wisely prop the mark at the plug of assembly with the regulator. Gently tweak the regulator and remove it.
Remove the petrol drive
The petrol drive is inserted on the side of the machine. Never pull it directly; you should first strut the petrol pump.
Now you should apply a slight force and remove the device to separate from the petrol drive. So the petrol inside it uses a U-tube to go back to the tank when vacuuming the parts.
Attach the cleaning kit to the injector
Now attach the cleaning kit to the petrol port. Regulate the coaching kit and secure it and connect it properly.
Follow the directions of how to connect the port and hose. It may differ between various kits. Disconnect the cap from the gas device canister.
Fill it with the cleaning fluid, hang this equipment below the hood in an accessible location beyond the engine. Adding a ranch hand grill is good to secure the parts.
Now connect the petrol rail test harbor. Install the device to the oil rail with a proper adapter. It will eliminate the grime, dirt, debris by using a lot of pressure.
Make sure to disconnect the cap before vacuuming. It helps to keep high pressure and prevent burning, ignition, or combustion. You can replace the cruise control switch and use it accordingly.
Keep it running for sometime
After attaching the equipment, again confirm that the pump is off. Start the machine and leave it for a few minutes.
The engine will break the running when the fluid enters all the parts or is used up. It takes about 10 minutes to vacuum the injector.
Attach the wires and connections
Now it is time to reconnect everything in its right place, reinstall the vacuum line, and the power supply.
Put back the cap into its proper place. Mount it with the wrench, now gently disconnect the set and reinstall the parts and the pump correctly.
At first, the pickup may start roughly but after a while or using perfect oil pressure; it runs smoothly. You can clean the pitman arm for better performance.
If you listen to any unwanted or abnormal sounds while driving. There might be a problem with your vehicle. Recheck all the steps and read the instructions. You can replace the O2 sensor with the same technique.
What are the symptoms of a clogged fuel injector?
Here are the symptoms of a clogged fuel injector, and these also explain when you should replace it.
- Engine pinging
- Bumpy idle
- Poor acceleration
- Reduced gas economy
- Difficult to start
- Throttle reluctance
- Pre-ignition voices
- Poor gas mileage
Benefits
There are multiple advantages:
- Run an exhaust release test
- Eliminate the chances of the breakdown
- Increase dependability and safety
- Help to decrease air pollution
Related Articles: