

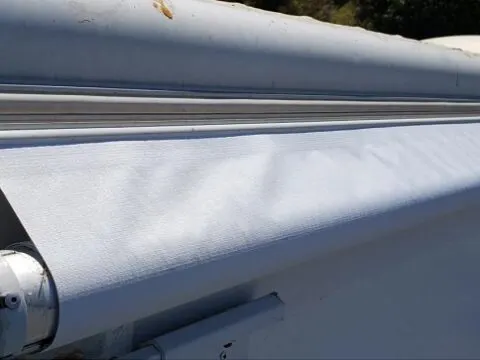
The awning roller tube is a roll that holds the awning fabric. It has stability and control for the awning fabric, and it never allows its free falling. You can replace this roller tube with 8 easy steps.
How to Replace RV Awning Roller Tube? Replace the RV awning roller tube with a new roller and detachment of fabric. Reinstall all the removed screws and springs from the roller tube. Attach the side caps and adjust the tube arms in one spot.
The awning fabric can move in and out with the help of this roller tube. The movement is low and smooth, and it holds a spot.
How to Replace RV Awning Roller Tube?
You can perform the process of replacing the RV awning roller tube in your garage or any other ground. You can also take the help of a friend to perform the process in minimum time.
Tools required
- Ladder
- Screwdriver
- New roller tube
- Clips
- Bolt puller
- Measuring tape
Purchase a new roller tube
The holes or other damages lead to the removal of the old roller tube from the RV.
Purchase the new awning roller tube according to the older specifications. Never neglect the older specifications of the part of awning sections. They are supporting factors to select the right roller.
In those circumstances, when you avoid the older instructions, then the process becomes a disaster. It becomes time-consuming, and the maintenance cost gets heavy on the budget.
Make sure that the new tools are compatible with the already existing equipment. The low quality and such conditions are not beneficial in this process.
The avoidance of such criteria can lead to difficulty in installing. You can lose money and time simultaneously, and it is never advisable. Take professional help to select the accurate roller tube for the awning.
Access its location
Access the location of the older awning tube for its replacement. You can read the manual to take help, and it also offers picture demonstrations.
The Awning roller tube is usually on the top surface. You can reach the top surface with the help of a ladder. It is not easily accessible in terms of height because it holds a specific spot.
Remove screws and clips
Remove the screws of the roller tube, and use an accurate screwdriver to lose the material. Remove the side clips and all other supporting tools.
The removal of these screws makes room inside the roller tube. You can remove it from the structure with a specific amount of force.
Pull the relevant bolts with a puller and add other supporting materials in this place.
It keeps the camper safe from scratching and other such damages. Never add permanent material in the openings because it leads to irreversible damages.
Detach the fabric
Detach the fabric from the roller tube and keep it aside. You can discard the fabric material of the structure in case of damages.
You can also add the new RV awning fabric to the electric awning. Take the help of 2 – 3 people and keep it aside for future use.
Discard the old roller tube
In this step, discard the old awning roller tube. You cannot perform this process alone because the awning roller tube is heavy.
It requires expertise and enough amount of force to detach such a massive tube. The removal of screws makes it loose already.
The step requires two people on both ends of the awning tube and hold the ends up to 3 – 5 inches from the roller tube.
Pull it in front of the vehicle with a specific pulling force. Keep pulling it until it comes down to the ground flow.
Detachment of the side arms is another process, but the removal of bolts makes it easy and removes the sides of the awning tube with the help of a person.
Take control of the whole structure on the ground surface with complete detachment. In case of any error, hold it in its place and then remove the holding joints.
In those situations, you have not removed the awning fabric, and it sticks in the middle of the procedure.
Ask another person to pull it from the ends. Detach it from the rolling tube with the help of a ladder.
You can also perform this step alone with the help of heavy masses. Take the support of bricks or other massive stones and hold the ends of awning material.
Attach and install new roller tube on RV awning
Adjust the new roller tube in the RV awning in its original position and push it for proper settlement. Control both sides at one time for control and security.
Add clips on both corners and make the awning tube roller firm in its place. Add the roller to the already existing holders and attach them with supporting tools.
Never attach the arms of the tube in the initial steps. It can lead to various errors, and the process becomes time-consuming.
Adjust the free moving parts with the help of non-permanent holders. You can also take the support of two people to hold the arms in an accurate direction.
Avoid the tremble and shaking of the arms during the installation of the new tube roller.
The vibration of the equipment leads to improper adjustments, and few people end up making holes in the tube and its structure.
It is not a suitable condition because equipment loses all of its strength due to one tiny error.
Insert the springs in the roller tube and adjust all the controllers in the right place.
Check and observe the level of these materials during the process. In case of any disturbance, change their points and locations.
Make sure that the openings of the rivet are in one straight line. Change and tight the tools on both ends of the awning roller tube.
Add the gripping materials on both ends of the brackets. Tight all the springs with a proper tool and keep the direction counterclockwise.
The directions are suitable to tight all the springs, and you can check the movement of the roller tube.
Attach and adjust the arms of the awning on both sides of the RV. The caps of the roller tube may comprise the already existing screwdriver.
Discard it from that spot and add them back into its place. The addition of a lubricating material makes the movements of the roller smooth.
You can move and roll it, and it is a beneficial feature. Reinstall the old or new fabric back into the rolling tube. Follow the guidelines and install the shade fabric.
Adjust with screws
In this step, adjust all the relevant screws in the arms of the rolling tubes. Cover the screws with protective material to enhance their activity.
Use a sealant to make the crew powerful, and they become active in such attachments. Make sure that the covering material is waterproof.
It prevents the arms and screws from corrosive properties, and they are not suitable for the roller functions.
Down the brackets for few seconds and attach the arm with screws. In those circumstances, when you tighten the screws for the final step, observe the movement of the roller.
You can install these crews with the help of a drill. These tools are efficient and can easily make the screws firm in their position. They prevent the movements of arms during the use of rollers.
The firmness increases due to the presence of protective materials on the screws.
The whole system gets firm and stable in the original state. You can use the roller tube to move the fabric outward and inward anytime.
Check the movements of the roller tube
In the final step, check and observe the movement of the roller tube.
It must fulfill the criteria of the awning roller tube in all possible ways. It should move slowly and gradually when it is moving out from the RV.
Related Articles:
Where to hide a safe in your RV?