

Heat tapes are also known as resistive heaters, pipe heating cables, or heat cables that can be non-regulating or self-regulating types. It is like a long plastic ribbon that wraps around the RV waterline while connecting to the city water.
Can You Put Heat Tape on RV Water Hose? You can put heat tape on the RV water hose to protect inside water from freezing below freezing temperature. First, you have to cover the waterline with Aluminum foil and align the heat tape with the water hose rather than wrapping it. Then, cover these inside the foam insulation. Avoid warping the thermostat because it needs air exposure. Double-check all the adjustments and plug the heat tape into an electrical outlet.
You always need a mechanism and necessary arrangement to keep water stored around you warm and ready to use.
Using heat tape for RV hose
In common practice, usually, two types of heat taps are being used across the world. First is an electric element that wraps around the water hose.
The self-regulating type is the best option because it has no thermostat and when heat requires it provide and maintain a temperature.
Similarly, another type of heat tape is a steam coil, and this parallel running tape can sometimes extend to a water hose spigot.
Its extension to spigot is for complete insulation and heating of water during cold. However, most of the time, people prefer electric elements for heat tape.
The reason behind the preference of electric elements over the steam coil is the unavailability of steam. On the other hand, electricity is readily available inside your RV wherever you go or camp.
Easy steps to put heat tape on the RV water hose
Heat tape on the water hose disallows any heat loss during cold. It holds heat inside the hose, keeping the water in your RV warm enough for typical use.
In other words, it insulates the water hose from any heat dissipation at a varying temperature outside the hose.
During its attachment with the water hose inside your recreational vehicle, you must be well aware of all thermal parameters.
It will allow you to plan your tour or camping in chill weather without any uncertainty and worry of losing a usable water source at a crucial time.
In an efficiency check, you must check how much heat it will lose with the passage of time or changing temperature outside the water hose.
In an ideal or best-case scenario, its heat loss should be minimum. For this purpose, you must select its material carefully and get this from some authorized vendor with an excellent reputation.
Select the heat tape
First, you have to purchase it from a reliable source. You can buy it from the hardware store of the plumbing department or the RV supply store.
These come in various sizes, so measure the length of your water line first and then buy according to the instructions on the package for your water hose.
The design you select should have a clear plastic bubble on the end where the electric connection is present.
When it connects to an electrical outlet, the red light indicates that it works well. You must also obtain foam pipe insulation following your requirements.
This black closed-cell foam insulation material is available in 7 to 9-foot lengths. However, it is expensive and costs you more but more advantageous.
Materials that you need to complete the process can be Aluminum foil, Duct tape, split foam insulating tape, and other necessary items according to the need.
Depending on its length, it can cost you around $15 to $20. Proper maintenance of it increases its performance for a period.
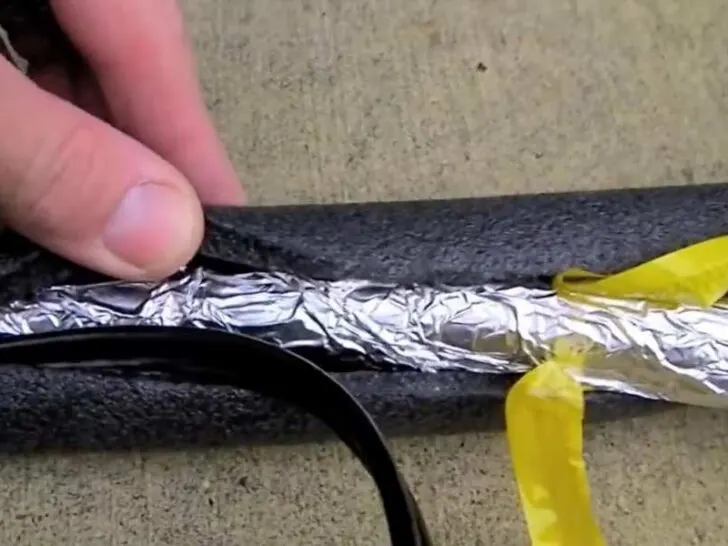
This step usually is not preferable by all the users, but in my suggestion, it is the best idea to help the uniform heat dissipation.
Usually, heat wrap comes with two components like one is heat tape, and another is foam insulation. The spirals of the tape should be set 17 inches to 25 inches apart from the hose.
Align the heating cable with the waterline rather than wrapping around it.
Use the electrical tape that holds it and the hose after every 10 inches to 17 inches to keep in its position.
The advantage of electrical tape is that it can stretch or expand according to the water pressure in the hose.
Make sure the thermostat has exposure to the outside air. It is snug and warm, so it is preferable not to cover it with insulation.
If you use a water pressure regulator, make sure it should not have plastic material.
When the temperature drops below 32 degrees, you should leave a small drip of water running through the water line into the motorhome. The thermostat controls the heater’s and heat cable’s on/off operation.
Wrap foam insulation
Next, you have to wrap the foam insulation around the aluminum foil-wrapped hose. These come in various sizes, so choose the ones that will fit inside them, which can be 2 inches in diameter.
It keeps the heating cable in its place and preserves the heat inside during cold below freezing conditions.
If the hose is long, insulation is also required; use duct tape to ensure that the hoses fit snuggly within and that the insulation is secure. Some have self-adhesive tape to keep it together.
If you cannot find the proper size, put one over the other and secure these together with the electrical tape.
Next, cover the water spigot with heat tape. Finally, insulate the faucet with foam insulation to prevent the water from freezing.
Connect the heat tape to the electrical outlet
Before connecting with the electrical outlet, double-check the waterline and spigot.
In the end, plug in the heat tape to the electrical outlet or campsite power. Then, when the temperature falls below freezing, the sensor will turn on the heat.
Why do you need heat tape for the RV water hose?
This tape protects the RV water hose during freezing condition without any sewage problems. However, it produces heat that does not freeze the water inside it during freeze outside.
Regardless of weather conditions and your stay period, you have a water supply facility at the motorhome park-water hookup.
There can be some tips and tricks that you can follow or consider.
While using, make sure to not insulate or cover the thermostat with it. For it to perform well, it must respond to the temperature.
Some people are unaware of it or have no interest, in which case, thermostatically regulated heated pads are the ideal alternative.
Precautions when using heat tape for RV
While installing heat tape on a water hose inside your RV, there are a few things to keep in mind. Firstly, you should make sure that it is installed outside the pipe directly, which use for water distribution or circulation.
Secondly, this tape should be below insulation wrapped around the pipe to insulate it against the cold outside.
Furthermore, insulation around the heat tape must be complete and best enough that heat dissipation should not occur during water regulation for routine usage.
Related Articles:
Tips to protect RV cover from ripping