
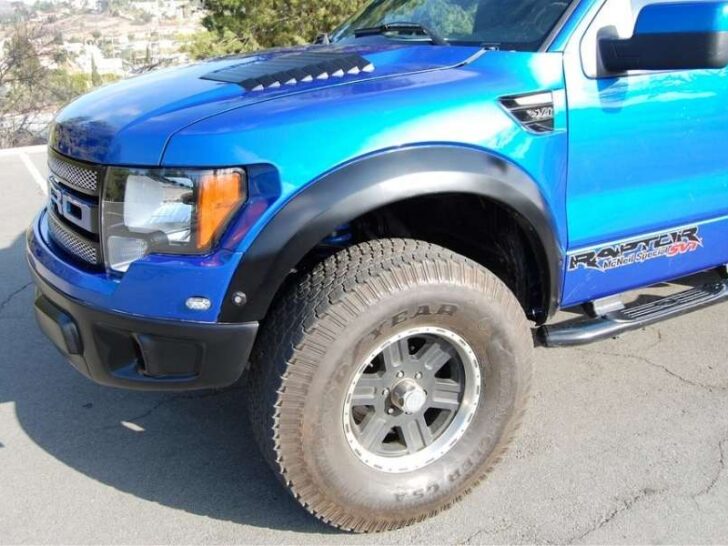

Raptor fenders are of plastic and fiberglass material, lightweight, and support the F150 front and rear wheels with seamless panel transition.
Can You Put Raptor Fenders on F150? You can put Raptor fenders on F150 by adding a seal behind, add protection screws, and establish warning lights wire connections. Also, attach split end wire with the plug, clean the surface, remove the mudguard, and install the Raptor fenders with bolts and screws. Furthermore, Raptor fenders resist UV rays, protect tires, and features additional LED lights on both ends.
However, they have the similar design, settings, and appearance as a Ford F150 panel, but they are 7 to 8 inches wider than them. Also, they are resistant to water free from corrosive effects and increases ground clearance on front and rear wheels.
Across America, 20000 models of 2004 to 2008 of Ford F150 uses aftermarket raptor fender.
Generally, these fenders installation is beneficial for trucks because the method does not involve frame drilling and panel cutting. Also, they instantly make the F150 taller, attractive and provide ground clearance.
How to put Raptor Fenders on Ford F150?
I have mentioned a step-wise guide to put the raptor fenders on any model of a Ford F150. Also, the below tools are specific for these procedures.
Tools required
- A ratchet
- Philips screwdriver
- Scissors
- Electric wire cutter
- Connecting zippers and ties
- Knife and sharp cutter
Add sealing on a new fender
Before initiating the procedure, the preparation of the fenders is essential, especially when they are brand new. Also, a long sealing material with a double-end tape on the backside supports the fixation procedure without any error.
Moreover, the sealing material not only supports the fenders but also protects the Ford surface. Next, put the item upside down, hold one edge of the sealing rope and adjust on one corner. Also, tuck it inside the edges, remove the dual tape and fix it.
In addition, use sharp scissors and cut the end for precision and appropriate adjustment. Moreover, purchase the sealing rope from authentic portals according to your requirement for around $25 to $36.
Add Philips screws
Generally, to secure the front edge of flares, add the screws with wire attachments. Next, push them from the front side in the hole and add a screw.
Furthermore, use a Philips screwdriver and tighten the attachment tool. Moreover, fix both screws from the inner side of the device.
Connect the wiring and use pliers
Typically, electrical wiring during fender attachment is a complex activity and requires professional expertise for problem-free connections.
In the beginning, use a long electric wire with three possible ends. Also, electric wiring fix in the warning lights and installation happens on the passenger side of a Ford F150.
Next, hold the wire split ends, add it in a hole, push it through the hood, and move behind the headlights. Furthermore, utilize a similar side from underneath the truck and connect it with the open wires of fenders.
In this process, use the connectors and join the ends with insulation and control. For this attachment, use a wire cutter/stripper, and cut the front side. Also, bring the naked wires outside, and perform similar stripping on the fender wires.
Next, add a connector or tie on one end of the wire, clutch the joint with a pressing tool. Also, check the adjustment, add its wire in the same connecting joint, and perform the clutching.
Moreover, perform this procedure for the end of the split wire and then proceed to the dual split ends on the hood section.
In addition, grab a plug with positive and negative wires. Next, use a sharp knife, cut the tape from the plug wire, split its ends, and add plastic clips on both of them.
Furthermore, attach clips on the front ends of the split wire, connect them to the plug clips and fix the plug back in the original state.
Detach the old fenders and remove mudguards
In this step, use an air ratchet and remove the side bolts one by one. Also, hardware removal is necessary when the old fenders are not available on the arch.
Furthermore, fix the ratchet in these screws, and invest time to remove them because few of them have corrosion.
Also, a mudguard exists on a Ford F150 for repelling the dirt, debris, and other such particles. In addition, it protects the surface from corrosive material with water rejection.
However, pull the clip with a flat end screwdriver and detach it from the surface with a specific amount of strength.
Install metal clips on an arch
First, clean the surface with a commercial and efficient cleaner. Also, rub the surface with a lint-free piece of fabric and then proceed for hardware installation.
Furthermore, the Ford F150 fender arch contains 5 1/2 mm screw holes on the bottom side. So next, take three metal clips and fix them on the sides and middle section with the help of factory screws.
Moreover, add the central clip upside down, adjust the clip hole on the screw opening, add the attachment things, and tighten them.
Adjust the fenders and add attachment tools
Next, lift the raptor fender, add it to the arch near the clips and attach the side bolts for stability. Next, add the bolts on the factory holes of the guard and support the new item.
In addition, add the screws in the mounting brackets (the metal clips), add a screwdriver, and fix them one by one.
For the rear wheels, use a similar procedure, but electric wiring is not necessary. Also, add them through the clips, bolts, screws, and mounting brackets.
Why would you install Raptor fenders on Ford F150?
Here are few reasons due to which a person prefers raptor fenders over factory items. Also, it has become a trend for upgrading the appearance of a Ford F150 with these sleek and attractive items.
Resistance to ultraviolet radiations
Generally, the UV rays destroy the shiny surface of a pickup truck, and paint reduces with time.
But, these are resistant against these harmful radiations, protect the top layer, and are long-lasting than factory items. Also, they cover the area above the wheels and do not allow the rays to penetrate them.
Lightweight material
The manufacturing material is attractive, stable, and yet lightweight. Also, these items are convenient to handle, and lifting is comfortable for any person.
In this way, their movement becomes smooth without any truck surface damages. Furthermore, a person can control their sides, and installation becomes quick and comfortable simultaneously.
Adds appeal to the truck frame
Typically, factory items support the pickup truck frame, but raptor fenders increase the appeal. Many people use fender flares to cover rust on their vehicles.
Also, they make the side arch attractive, and the truck stands out in a stock of various vehicles. On installation, they merge in the frame and become a part of a truck style.
Protection of tires and cleanliness
In general, in their addiction, the tires become secure from road hazards, environmental conditions, and sudden damages.
Also, the lifespan increases from 2 to 3 years with minimum cracks and wearing conditions. Furthermore, they resist the debris and keeps the wheels clean on all roads.
Street-legal high-speed trucks
F150 is a fast-speed, stable and credible truck, but it remains street legal despite these additions. Also, the authorities allow these installations without any penalties and restrictions.
LED lights on both sides
A light-emitting diode light is beneficial for the appeal, protection, and control of any pickup truck and its front bumper. Also, these have additional built-in lights that work on the Ford electricity.
Furthermore, with appropriate wiring conditions, the lights flash in darkness and comfort the driver during traveling.
The average cost and time required
Generally, the installation activity requires various tools with different price ranges. On average, the procedure costs you around $590 to $1400, including the tool cost. Also, the labor charges are $40 to $70 per hour.
Furthermore, it is a time-consuming installation, requires appropriate knowledge of electric wiring and professional expertise. However, the average time required is around 2 to 3 hours, and it varies according to the availability of tools and experience.
What are the disadvantages of adding Raptor fenders to a Ford F150?
Here are a few of the disadvantages of adding these fenders to your truck.
Loss of lane sensors
Generally, the F150 models have an adaptation for the lane departure sensor on the front wheels. Also, the sensor locates on the bottom of the front fender, near the rocket area.
But, these do not support these features, and the trucks lose these sensors. Also, it is a disadvantage for those who have fewer driving skills and no steering control.
No mudguards with raptor fenders
Typically, these are enough to protect, cover, and stabilize the truck wheels and frame. Also, for dirt repelling, water resistance, and debris control, items utilize these built-in features.
However, the mudguard removal is necessary because one end does not fit without these removals.
Related Articles:
Tips to add fender flares to a F150
Tips to fix Ford Raptor third brake light
Is it normal to see F150 oil pressure gauge fluctuation?